Bluetooth payment terminal
> [HTML Version](bluetoothplatebniterminal.html)
This chapter describes the settings of the payment terminal controls for a Bluetooth connected terminal. The sequence described below relates to the preceding chapter [Connecting a third-party terminal](pripojeni-terminalu-treti-strany.md).
[Pairing the terminal with a cash register](#sparovani)
[Installation and initial setting of a payment terminal driver](#instalace)
[Setting a payment terminal driver](#nastaveni)
[Advanced options for Sonet and Monet terminals](#pokrocile)
# Pairing the terminal with a touch cash register
The payment terminal is connected to the touch cash register using a Bluetooth connection. So before using the terminal itself and configuring the payment terminal driver, you have to pair it with the cash register.
| | |
|------|------|
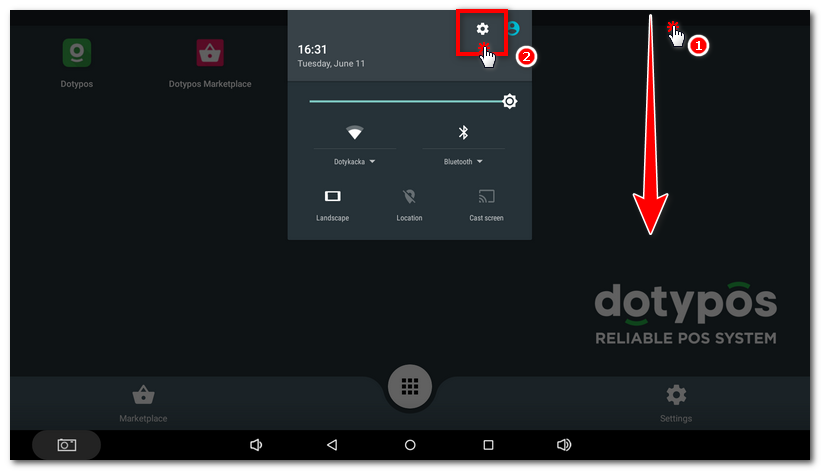
| [] | On the main screen use the gesture to pull down the settings panel [] and click on the sprocked [] to enter the Android system settings. |
[]
| | |
|------|------|
| [] | In the settings list, click on **Bluetooth**. |
(./images/clip0208.png)
| | |
|------|------|
| [] | First enable the Bluetooth connection by pushing the switch [] to the right. Then click on the found device in the list [] represented by its MAC address or bank identifier in the format RPOSXXXX where X stands for the numbers - this is the payment terminal. The payment terminal must have the Bluetooth connection activated. Otherwise the cash register will not find it, so it will not be displayed on the device list. |
(./images/clip0209.png)
| | |
|------|------|
| [] | Other devices may also be represented by the MAC address on the list. So the MAC address of the payment terminal on this list must correspond to the MAC address you find on the bottom side of the payment terminal, or the address you see on the terminal when switching it on. |
| | |
|------|------|
| [] | Once you click on the found device in the list, the dialog to enter the PIN appears. To pair, enter **1111** and click on **OK**. |
(./images/clip0207.png)
Now your payment terminal is successfully paired with the cash register and you can go to the next step - the installation of the payment terminal driver as described further.
top
---
# Installation and initial setting of a payment terminal driver
For the installation sequence and initial setting of the driver, through to selecting the connection type, please consult the chapter [Connecting a third-party terminal](pripojeni-terminalu-treti-strany.md#instalace). Then continue as described below.
top
---
# Setting a payment terminal driver for Bluetooth connection
| | |
|------|------|
| [] | After clicking the option **Bluetooth** (see the [preceding chapter](pripojeni-terminalu-treti-strany.md#typ_pripojeni)), enter the terminal MAC address. You will find it in the list of paired devices, see the first step [Pairing the terminal with a touch cash register](#sparovani), on the [bottom](#mac) of the terminal; you can also see the MAC address shown on the terminal display when switched on. The MAC address must be in the format XX:XX:XX:XX:XX:XX, e.g. 00:11:09:95:26:FA.
As soon as the correct MAC address is entered, click on **OK**.
(./images/clip0210.png):08
[]
You find the MAC address on the bottom side next to the label BT Adr: (see the picture). In this case, the correct MAC address is 54:7F:54:3E:78:24, skip the first two characters.
(./images/bt.jpg)
|
| | |
|------|------|
| [] | Finally, check the entered data to ensure it is correct and save everything with the button **SAVE**. The option **Enable full communication** **logging** should be kept unchecked.
(./images/clip0211.png) |
| | |
|------|------|
| [] | Now you can check the correctness of all settings and whether the cash register is able to communicate with the terminal. Use the button **PAY** to make a test 1 CZK transaction with a real debit/credit card. For each option, use the arrows to select the type of the test transaction [] and its currency []. If everything is set up correctly, you will see the information** TRANSACTION IN PROGRESS** and on your terminal the amount of 1 CZK to be paid will be shown. You do not have to finish this transaction, just cancel it directly on the terminal.
If the cash register is unable to communicate with the payment terminal, a warning message appears. If that happens, ask your IT consultant or terminal provider for advice about what steps you should take. |
(./images/clip0205.png)
If you have everything set up correctly and the test transaction went through, see [how the card payment works at the cash register](platby-kartou.md).
top
---
# Advanced options for Sonet and Monet terminals
### Printing receipts using an external application
This option allows you to print records about card payment from the cash register application on the receipt. It is again available via the three dots icon in the top right corner after clicking on **Settings** (see the [previous chapter](pripojeni-terminalu-treti-strany.md#krok1)). For enabling printing on receipts, activate this option. Printing using an external application is only supported by Sonet and Monet payment terminals.
(./images/clip1197.png)
top