Printer control panel
You find the printer control panel with lights and the FEED button on the top side of the printer:
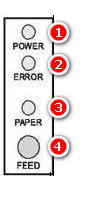
•The light POWER  signalizes that feeding is plugged in and the printer is turned on.
•The light ERROR  signalizes the following situations:
▪Printer overheating
▪Paper running out
▪Paper cover open or incorrect knife replacement
•The light PAPER  switches off when the paper runs out or is changed improperly.
•The button FEED  is used to feed the paper.
Printer mode settings
The printer has preset default factory values. However the default printer mode can be changed by the user as needed using DIP switches that are available on the bottom side of the printer after unscrewing the cover.
The functions of individual DIP switches are as follows:
Switch |
Functions |
ON |
OFF |
1 |
Cutter |
Without cutter |
With cutter |
2 |
Sound notifications |
With sound notifications |
Without sound notifications |
3 |
Print density |
High density |
Standard density |
4 |
24-byte mode |
Without Chinese characters |
With Chinese characters |
5 |
Number of characters per line |
42 |
48 |
6 |
Cash register drawer |
Open the cash register drawer |
Close the cash register drawer |
7-8 |
Transfer speed (for serial interface - see table below) |
||
Transfer speed (bit/s) |
Switch 7 |
Switch 8 |
38.400 |
ON |
ON |
115.200 |
OFF |
ON |
9.600 |
ON |
OFF |
19.200 |
OFF |
OFF |
|
We recommend not to change DIP switches. The factory printer settings are optimized already. Improperly setting the switches may cause the printer to malfunction. |