Printer description
 |
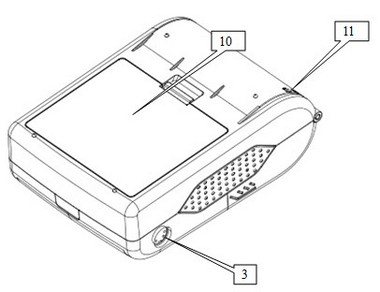 |
1.Button for paper feeding
2.Indicator of operation (red LED)
3.Serial port RS232
4.Infra-red light interface (IR) (according to the selected configuration)
5.Printer top cover
6.On/off button
7.Indicator of charging (blue LED)
8.Connector for attaching the charging adapter
9.Mini USB port (for servicing only)
10.Battery
11.Hitch for auxiliary hanging
Installation of Li-Ion battery
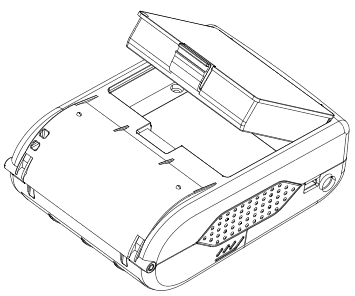
1.Insert the battery into the proper area as shown in the picture (respect the correct insertion and polarity + -)
2.Close the battery latch. For proper shutting put your finger on the battery under the latch until it clicks. If inserted correctly, the battery must be fitted in the printer firmly and must not drop out.
3.Now connect the charging adapter to the printer and let the battery fully charge.
Charging
Charge the battery prior to using the printer for the first time.
Connect the power adapter to the printer and then plug it into the socket. The flashing charging indicator signalizes ongoing battery charging. Once the battery is fully charged, the charging indicator flashes out.
You can use the printer during charging.
When the battery is charged, disconnect the charging adapter to extend the battery’s lifetime.
If the battery is empty, the charging indicator will be flashing. At the same time the printer will give off a sound notification.
Inserting and changing the paper roll
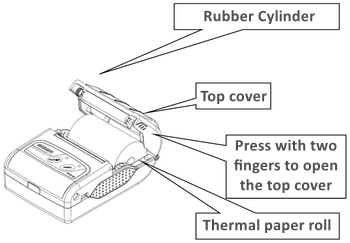
1.On each side press the point as shown in the picture above and open the top cover.
2.Pull the empty roll out of the printer (if the printer contains it).
3.Insert a new paper roll into the printer. Be careful to insert the paper in the right direction. If inserted in the opposite direction, printing will not be possible.
4.Make sure the paper goes out of the printer between the cutter and the rubber cylinder and then close the top cover.
5.In case of need hold the button with the arrow  FEED to pull the paper a bit.
Now go to the printer connection.