Inserting and activating the data SIM card
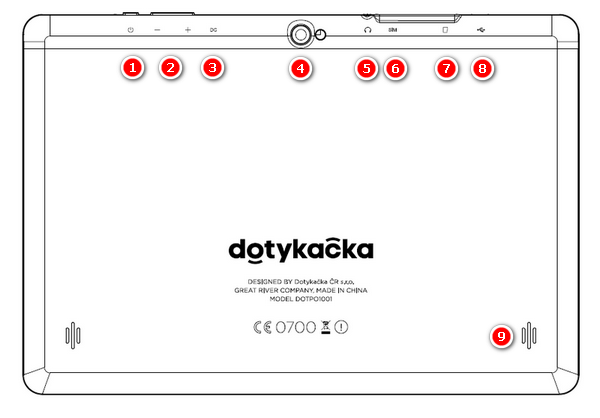
Back part
|
On/off button |
|
Volume adjustment buttons |
|
Power supply |
|
Camera |
|
Sound output |
|
Slot for SIM card |
|
Micro SD card slot |
|
USB port with power support |
|
Speakers |


Inserting and activating the data SIM card for old 10" cash register
1.Switch off the cash register. Remove the rubber cover from the upper side and plug the data SIM card into the left slot at the cash register top side (when looking at the back side) as shown in the picture. Insert the SIM card with the skewed side out until it clicks audibly.
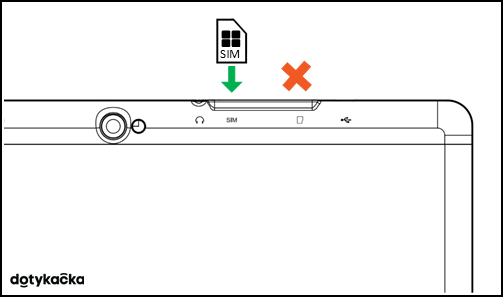
2.Cover the connectors with the cover and switch the cash register on. If the SIM card is secured, a dialog for entering the PIN will appear.
|
Always handle the data SIM card when the cash register is switched off. If you need to eject the SIM card, turn off the cash register and gently push the card inwards until you hear a click to release it. If the SIM card is not detected when properly inserted, restart the cash register or turn Airplane mode on and off. |
Cash register connection
1.Connect the cash register to the socket using the power adapter, and leave it to be charged continuously. The charging status can be constantly checked by short pressing the switch-on button. You can use also the USB port to charge the cash register.
2.Once the cash register is fully charged, plug the printer cable into the cash register USB port and then switch on both the cash register and printer.
3.If you have a mobile Bluetooth printer, insert the battery into the lower part and click it in. Connect the power adapter to the Bluetooth printer and then plug it into the socket. Let the printer charge. Once the printer is fully charged, the light goes out. Now you can start using it.
Sleep, shutdown and restart 10" cash register
|
To use a Bluetooth printer, it first has to be paired with the cash register. The pairing sequence is described in this chapter. |
|
Every time when you discharge the cash register completely, leave it to be switched off and charged continuously for at least 4 hours, so the condition of the built-in battery will be optimized. |