Based on the printer model the following connection types are supported:
•Wi-Fi
•LAN (Ethernet)
•USB
•RS232 (serial port)
•RJ to connect the cash register drawer
|
To ensure a permanent connection without outages we recommend to plug the printer with an ethernet cable directly into the active element (router) or with a USB cable to the cash register. This is the most stable connection. |
Ports are located on the back side of the printer
The available ports may differ based on the printer type.
USB |
Serial port RS232 |
LAN (Ethernet) |
RJ connector |
Power supply |
 |
||||
|
The cash register assembly guide including supported peripherals connection can be found in the complete user guide. |
Connecting to the POS system
1.Connect one cable end to the printer USB, Ethernet, serial or parallel port (according to printer model).
2.Connect the other cable end to the appropriate POS system port.
For the Wi-Fi connection, both the printer and cash register have to be in the same network and the printer should have a static IP address set.
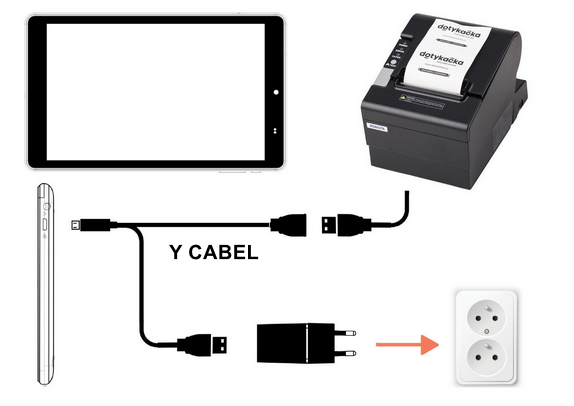
If you use the USB printer together with the 8" touch cash register (Dotypos MOBILE), you have to connect it to the cash register using the special Y cable found in the cash register packaging. In this case the cash register has to be connected to the feeding permanently as well. It cannot be fed from the battery during operations.
Connect the USB cable from the printer to the Y cable female connector. Plug the micro USB Y cable connector into the cash register and the other USB connector to the feeding.
|
More information about connecting the printer to the POS system including connecting via a LAN network cable can be found in the complete user guide. |
Connecting to the cash register drawer
Plug the cable into the appropriate RJ connector on the back side of the printer to connect with the cash register drawer. Use the cash register drawers with feeding 12-24V/1A that is compatible with the printer. Using an improper cash register drawer may damage both the drawer and printer. Do not plug the connector for the printer connection into the phone line, otherwise both the phone line and printer may become damaged.
|
More information about the cash register drawer installation can be found in the complete user guide in the chapter Connecting the cash register drawer. |
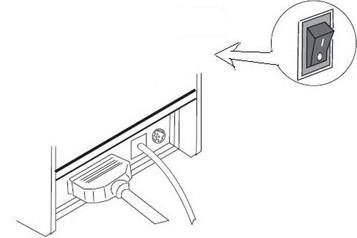
Feeding connection
1.Before plugging the feeding cable in, make sure the feeding adapter is not connected to the socket and the printer is turned off.
2.Plug the feeding adapter into the appropriate connector on the back side of the printer. Then plug it into the socket.
3.Turn the printer on using the switch on the left side of the printer.
Now go to the chapter Printer control.