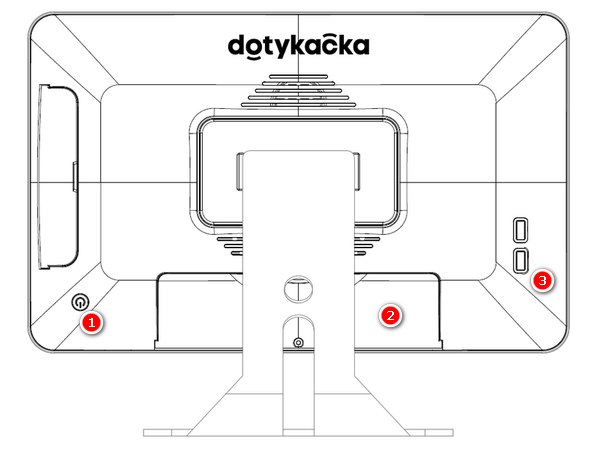
Back part
|
The button for turning on/off |
|
The cover for the panel with connectors |
|
USB ports |


|
•The display of the touch cash register is protected by a transparent film to prevent damage during transport. Be sure to remove this film before use. •Do not connect any devices other than printers, barcode scanners or scales to the Cash register's USB ports. Also, the customer display must be powered by its own adapter. Otherwise, the cash register may jam or damage the motherboard! |
Panel with connectors

|
Power supply |
|
Connecting the cash register driver (currently not supported – the cash register drawer is connected to the printer) |
|
Sound input |
|
Sound output |
|
SIM card slot (currently not supported – the cash register supports Wi-Fi or Ethernet WLAN) |
|
Micro SD card slot |
|
USB ports (lower right USB OTG) |
|
Ethernet WLAN |


Cash register connection
1.Unpack the cash register and place it on the table at the back side of the stand. Tilt it so you can see the covered panel with connectors at the bottom side. Now remove the cover.
2.Plug the USB printer cable (or also the bar code reader) into any of the USB ports  . You can use any of the USB ports, except the port marked red.
3.Plug the cash register drawer cable into the connector RJ on the back side of the printer. Some drawer types do not have the cable firmly connected, so you have to connect it both to the printer and the drawer. Find the connection plug (usually on the bottom or back side of the drawer).
4.Now connect the power adapter to the printer, plug it into the socket and turn the printer on.
5.If you have an Ethernet cable available for the Internet connection, plug it into the network connector WLAN  .
.
6.Plug the connector of the power adapter into the socket  , then plug the power cable into the outlet.
7.Put the cover on the panel with connectors, under which you pull the cables through. Put the cash register up.
8.Use the button at the back side to switch the cash register on. Your touch cash register is now ready for operation.
Sleep, shutdown and restart 15" cash register
|
If you are not able to switch the cash register on using the standard procedure, connect the power supply and wait for at least 10 minutes. Then switch the cash register on again. |
|
The touch cash register display is protected with a transparent wrap, so it does not get damaged when transported. Do not forget to remove this wrap before use. |