This chapter describes the settings of the payment terminal controls for a LAN connected terminal. The procedure below is related to the previous chapter Connecting a third-party terminal.
|
The correct setting of the payment terminal and controls must always be done by a technician of the terminal supplier. Therefore we do not recommend adjusting the driver settings. Improper settings may cause a communication breakdown between the cash register and the payment terminal. So, changing the settings may mean having to pay for another visit by the technician. The procedure described below is meant only for advanced users! |
Setting payment terminal controls for a LAN connection
|
Click on LAN option (see the previous chapter) and enter the IP address of the terminal set by the technician on the terminal in the context of its installation. The IP address must be always in the format XXX.XXX.XXX.XXX, e.g. 192.168.10.20. Then, enter the IP address of the cash register and confirm the two options to confirm the setting of a static IP address on both devices. As soon as you know the needed data, click OK. 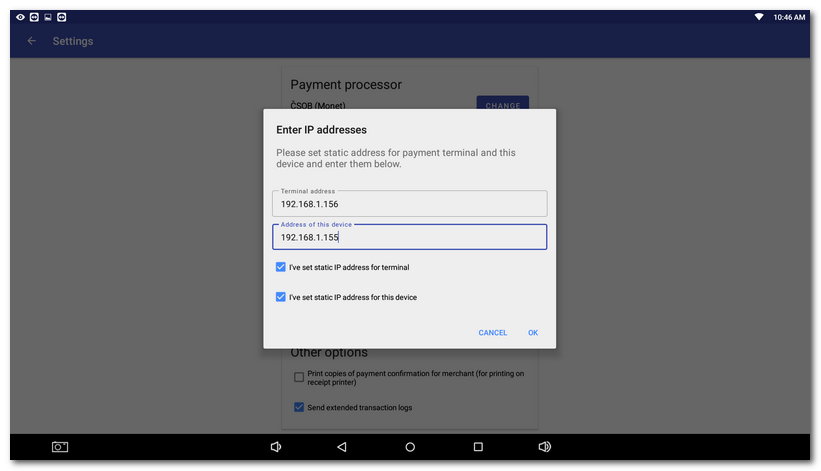
|
|
In the lower part, you will see other settings options according to the selected provider and terminal connection. You can also activate the printing of receipts from the payment terminal on the receipt printer connected to the cash register or sending extended transaction logs. Activate extended transaction logs sending only at the request of technical support.  |
|
If you do not know the terminal IP address, contact your IT consultant or the customer line of your terminal provider. Both terminals and touch cash registers connected via Wi-Fi or Ethernet must have static IP addresses assigned. |
|
Now you can check the correctness of all settings and whether the cash register is able to communicate with the terminal. Now use the button PAY to make a test 1 CZK transaction with a real debit/credit card. For each option, use the arrows to select the type of the test transaction If the cash register is unable to communicate with the payment terminal, a warning message appears. If that happens, ask your IT consultant or terminal provider for advice about what steps you should take. |
 and its currency
  . If everything is set correctly, you will see the information
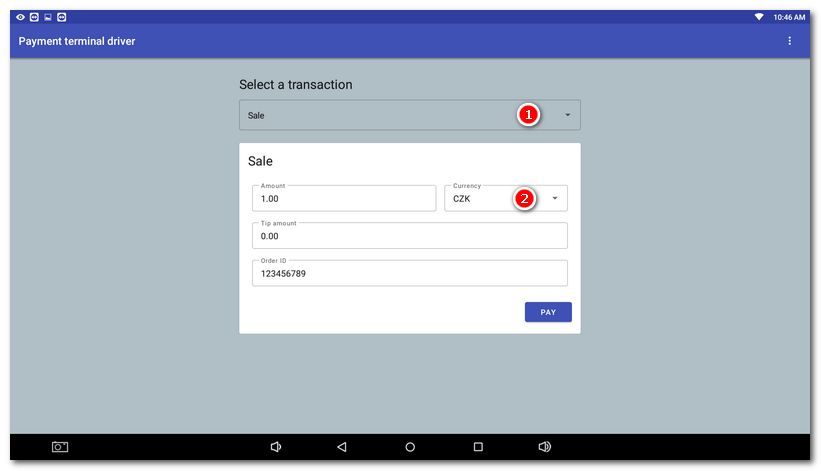
If you have everything set up correctly and the test transaction went through, see how the card payment works at the cash register.
|
We recommend that you repeat the test transaction after performing the following activities. Thus you will make sure that after restarting, the cash register or the terminal do not receive a different IP address. For working communication the IP address must not change after restarting and must remain the same permanently. •Cash register switch on and off •Payment terminal switch on and off •Switching the active element (router) making the network and allocating IP addresses on and off |