In the item Item management » Customers you can see an overview of created customer accounts. Every cash register payment can be assigned to a customer’s account. If for individual products you set a number of points, these points will be added to the customer’s account when the product is paid. You can create customer accounts either directly in the touch cash register or using Dotypos Cloud.
In the item Item management » Discount groups you set the rules for discounting all products. If you assign a discount group to a customer account, the discount set in that group will automatically be applied to the entire account with the assigned customer.
Help function Bulk edit allows you to choose multiple items to be moved to another category, deleted or modified (e.g. the tax rate or other parameters).
|
In Dotypos Cloud it is also possible to batch imported customers from the prepared .csv file. This file has the same structure as the file you get when exporting customers from Dotypos Cloud. However, the import and export of items is only supported in Dotypos FULL. |
How do I create a customer account?
|
On the Item Management » Customers Use the |
 tab, click the blue
  button. If you already have some accounts created, you can edit a selected account using the
  button, or delete it using the
  button. Clicking the
  button will display the
  button to export customers, and the button
 button. If you have
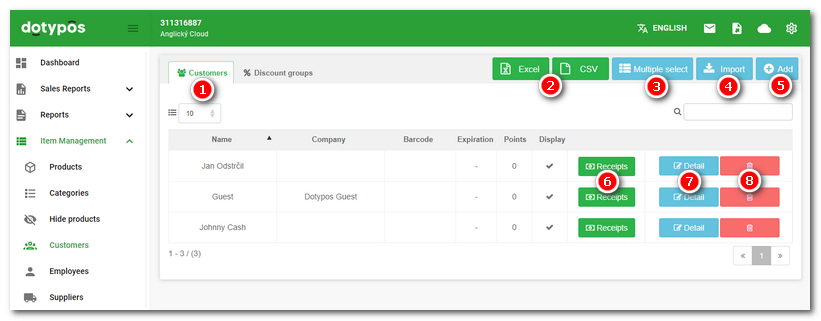

|
Fill in each field with the appropriate customer information. Detailed description of the fields can be found below the image. Once you have filled in all the required information, save your selections by tapping the Save button. |
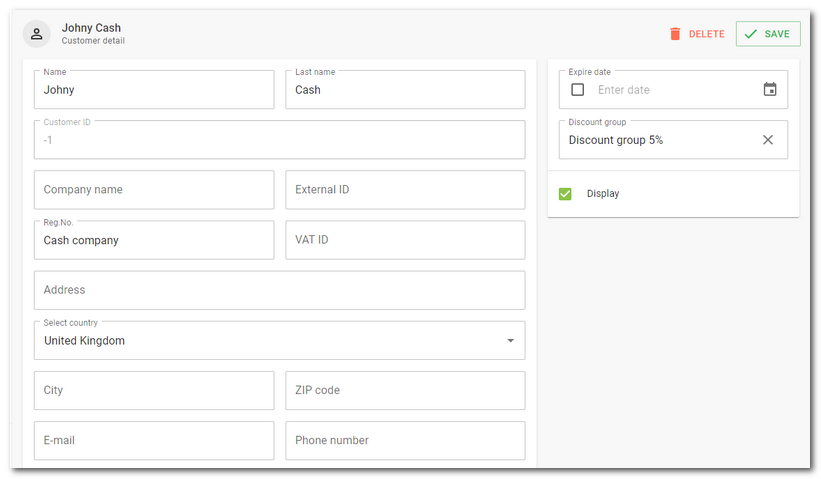
First name |
Customer name (the only required field) |
Last name |
Customer's last name |
Customer ID |
Internal customer number generated by the cash register |
Company name |
Customer's company name |
External ID |
Customer's own optional designation |
Reg. No. / VAT ID |
Reg. No. / VAT number of the customer. |
Address / City / ZIP code |
Customer's address |
Select country |
Country (nationality) of the customer. By default, the country selected when activating the cash register is set here. Selecting the country starts the activation when the Dotypos is first started. |
E-mail / Phone number |
Contact information |
Date of birth |
Customer's date of birth |
Expire date |
The date on which the customer's account will expire. Before setting the date, you must activate this option using the checkbox. |
Discount group |
If, you have set up your own discount groups, you can assign them to the customer using this drop-down menu. You can create discount groups on the Discount Groups tab. |
Display |
Use this option to temporarily hide the customer account without having to delete it. |
Current credit |
The current amount of customer credit. Displayed only if the customer has some unused credit. |
Available reports |
Links to related data reports. |
Internal note |
Custom note |
Default invoice due period |
Due date of invoices issued to the customer |
Points |
In this field you can see the current points balance of the customer. You can also enter a custom default point value. |
Barcode |
If you enter a barcode in this field, you can simply scan the barcode with a scanner or use EM chips to assign the customer to the items charged. |
Print header |
The text entered here will be printed on the receipt once the customer is assigned to the order. |
Tags |
You can tag and search for customers based on the tags entered in this. More on tags can be found in this chapter. |
|
A customer discount can be assigned anytime, but only until the order is closed by clicking on Checkout on the main screen of Dotypos. After pressing the button Checkout the order is closed and ready for later being sent to the Financial Administration as the EET requires, which means the price can no longer be changed. However, as long as you keep charging products, anytime before you press Checkout you can use the reader to load the customer card, or assign the customer account manually, and the set discount will be applied to the customer’s open account. |
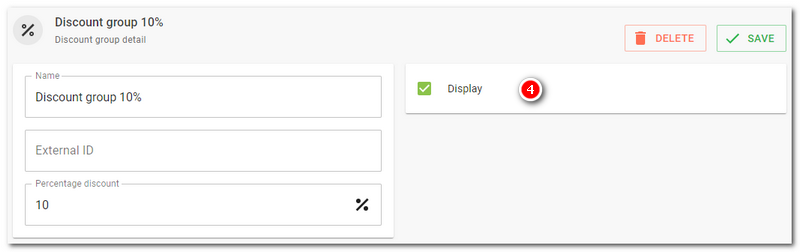
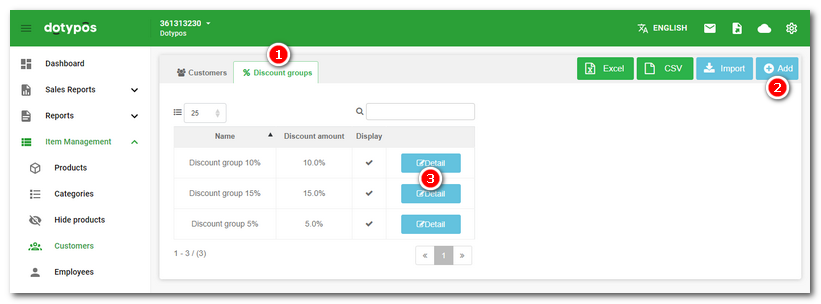
How do I manage discount groups?
With discount groups, you can specify a discount of a certain amount, valid for all products, which you then assign to a specific customer. You assign this discount to the customer when you create or edit the customer account described above.
|
Select the Discount groups |
|
In the dialog window for creating and adjusting discount groups select both the rule name and the discount, then confirm with SAVE. The button |