Here you set the general options for the payment dialog and receipt printing. Some of the options are found in the individual payment method settings.
Layout
This is where you set the payment dialog mode, which determines what controls are displayed.
•Automatic size - Depending on the device resolution, full or compact display mode is automatically selected.
•Full - All controls are displayed.
•Compact - The payment dialog is displayed without side controls, i.e. buttons for advanced order options.
If the device does not have sufficient resolution for the full payment dialog, the compact display mode will always be used, regardless of the option selected above.
Paid, To return
Use Paid, To return screen for cash payment method
If this option is enabled, the payment dialog will generally require you to enter the amount received from the customer. Based on this value, the cash register will then offer the corresponding amount to be refunded. You can also activate and set the amount to be refunded directly for the Cash payment method and override this setting. The following options will only appear if this setting is enabled.
Use on Cash register / Mobile waiter
This setting can be used to separately require the amount received to be entered at the Cashier or Mobile Waiter.
Use bank notes to enter paid value
If you activate this option, the values of individual banknotes and coins will be displayed for entering the amount received. You enter the amount received by selecting them. This will keep track of the number of banknotes and coins in the cash register / cash drawer. Suitable if you use Cash stocktake report. If this option is not enabled, the amount received is entered using the numeric keypad as standard.
Return in CZK to foreign currency payments
If this option is enabled and you have added an additional currency in the Currencies and banknotes section, the cash register will calculate the amount returned in CZK based on the exchange rate entered. Otherwise, the amount to be refunded will be in the added currency.
Behaviour
Request note before order issue
As soon as you click on the button Issue order on the main screen, with this option active the dialog to insert a note will always appear. So you can insert the note before you settle the order. The note will be also printed on the receipt, if in the printing task settings Printing receipts you activate in Fields to print the option Order note.
Request guest count before order issue
Before paying the bill, the payment dialog will display a dialog to enter the number of guests for that bill/table.
Require eat in/take away selection before payment
Displays a dialog for selecting here / takeaway sales when paying a order. Takeaway sales must be enabled to enable this option.
Suggest payment by invoice for receipts when total is more than EUR 10 000
When you issue a bill for an amount greater than CZK 10,000, you will be asked whether you would prefer to issue an invoice instead of a standard receipt. You can therefore choose to issue an invoice or a standard receipt. In order to enable this option, invoicing must be enabled.
Notify orders issued or paid without staff
If this option is enabled, when you operate on accounts through the Dotypos API, an information dialog will be displayed with an overview of the accounts that are currently being worked with through the API. APIs are used by third-party applications or services to synchronize with the cash register or, for example, to issue a bill at the cash register when purchasing an item in the e-shop, etc. If the cash register is being actively used, e.g. an account is open, the dialog is displayed only after the account is closed and does not disturb the operator.
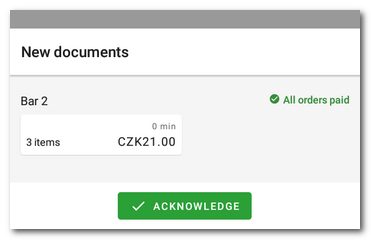
To close the dialog, tap the ACKNOWLEDGE button or tap the displayed accounts one by one.
Alternative item names on receipts
Activate to enable alternative product names on generated receipts such as invoices. By default, the alternative name is only printed on receipts, or price tags or purchase orders. It is also displayed on the customer display. The alternative name can be entered in the product properties.
Automatically send receipts / invoices by e-mail
If you have a customer assigned to an open order, a receipt or invoice will be automatically sent to their e-mail after payment and will not be automatically printed. You can also temporarily force / disable the sending regardless of this setting directly in the payment dialog.
Printing
Show print button in payment dialog
If this option is enabled, a button to print a receipt will be displayed in the payment dialog.
Ask for receipt print during payment
After closing the account in the payment dialog, the option to print the receipt will be displayed. This will allow you to print the receipt only on customer request. The option is also applied if automatic receipt printing is active.
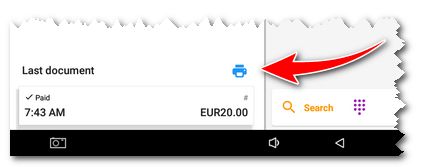
Show print button for last document
If this option is enabled, a print button will be displayed on the main screen in the last issued document information section:
Ask for the payment confirmation copy print during payment
After closing the order in the payment dialog, an option to print a copy of the payment confirmation from the payment terminal will be displayed. The copy will be printed on the receipt printer. This setting is valid only for Dotypay payment terminals.
Automatic payment confirmation printing from the payment terminal
After closing the order in the payment dialog, the confirmation of the payment made at the payment terminal will be automatically printed on the receipt printer. This setting is only valid for Dotypay payment terminals.
Both options above can be combined with the option Ask for receipt print during payment.
|
In this section you are also informed whether you have automatic printing of documents (receipts) active or not. This will help you with the optimal setting of the above printing options. You enable/disable automatic receipt printing in the Print receipts print job. For more information on the different options for printing receipts, see this chapter. |