Once you issue an order using the Checkout button on the main screen, the payment dialog will appear. Use this dialog to pay the current bill and perform other advanced account operations. Depending on its settings, the payment dialog allows you to:
•Use the quick action buttons to add a customer, set a discount or mark an order as paid and closed with one tap.
•Choose to tip before paying. In the case of a supported payment terminal (in the Czech language), the total amount and the selected tip will be transferred to the terminal. The customer can also enter the tip into the payment terminal.
•Select your accepted payment methods separately for the register and Mobile Waiter and choose their order in the payment dialog.
•Easily split the amount paid between multiple payment methods.
•Add rules to each payment method to modify its behavior and availability to the operator both at the cash register and in Mobile Waiter (to be available later).
•Display the amount to be refunded based on the payment received from the customer. The amount received can also be withdrawn from specific notes and coins.
•Accept other payment currencies.
•Pay by bank transfer, where the customer makes an instant payment by scanning the QR code on the receipt.
•Issue invoice for ordered products.
•To write off of products and their raw materials.
|
The different scenarios in this chapter show you how to set up the cash register behaviour when paying and closing an order and how to work with the payment dialog. |
Description of the payment dialog
Once the order has been issued from the main screen, the default payment dialog screen will appear, as shown in the image below. If you don't need to change anything, tap on the payment method you have selected  . Depending on your current payment settings, you will then be presented with a dialog for selecting a tip or entering the amount received from the customer.
It will then be possible to close the order clicking with the selected payment method. The payment will be registered as paid and if you have set up the corresponding print job, a receipt will be printed. If neither the tip nor the option Paid, return is active, after selecting the payment method the account will be paid and closed directly without any further operations.
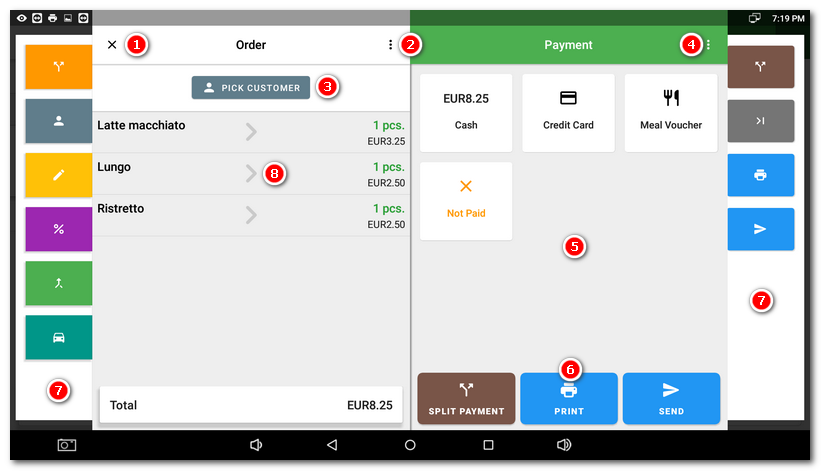
Payment dialog description
•Use the cross  to close the Payment dialog, go back and continue working with the open account.
•Click on the three vertical dots icon  in the section Order to display the advanced order options. Holding your finger on this icon at length will divide the order and display the window To pay. Transfer the items you want to have in a separate order and paid separately to this window. See the chapter Dividing orders. Also use the arrows
  to quickly split the items in your order to pay separately.
•With the button PICK CUSTOMER  to assign the account to a particular customer.
•The three vertical dots  in the section Payment display advanced settlement options. These options are not available if an item in the order or the whole order is sold (recorded) by proxy.
•In the section , tap to select a payment method to pay your order and move to the next step. The available payment methods depend on these settings. You can change the payment method for an already paid (closed) order in History. After selecting a payment method, you can change the value of the amount paid in the next step. The amount to be refunded will be automatically calculated accordingly and the cash register will show how much to refund to the customer. Optionally, you can enter or select a tip from the customer's suggestions before closing and paying the order. The Not paid button closes the account without payment. The transaction will be marked as unpaid in the Payment history and you will be notified of this unpaid bill when you close the cash register. Notification of unpaid orders can be turned off in this setting.
•Use the Split Payment, Print and Send buttons  to split the payment between multiple payment methods, print a copy of the receipt or e-mail it to the customer. However, you can also split the payment by entering the amount received less than the total spend after selecting a payment method. You will then be automatically returned to select another payment method to pay the balance.
•On the left and right side, shortcuts  are displayed for advanced order options or advanced payment options. These shortcuts are not available if the device does not have sufficient display resolution.
|
•For closed and paid orders, it is possible to change the payment method used to paythem in the History. •In the Print receipts print job, you can optionally turn on mini-receipt printing to help save thermal paper. •In this setting, you can activate print on demand and print the receipt only on customer request. •For more information on the different options for printing receipts, see this chapter. |
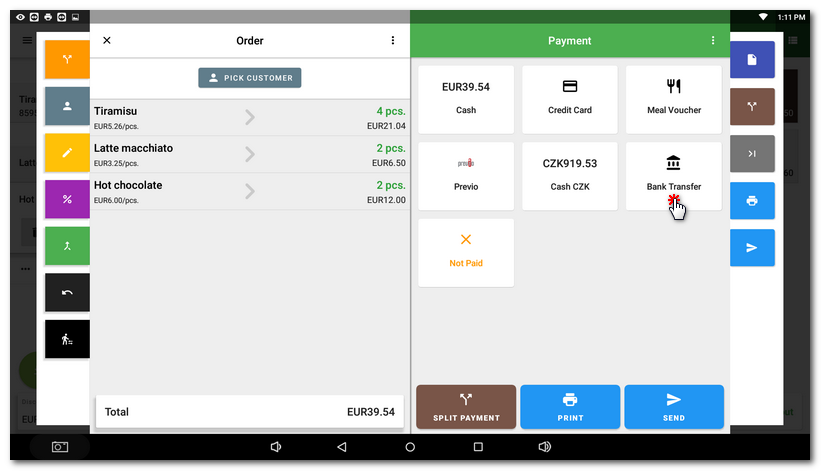
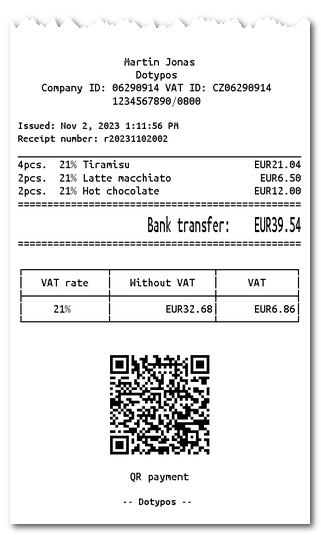
Payment by transfer via QR code
For the transfer payment method, Dotypos can print a QR code with payment details on the receipt. Thus, the customer can easily make the payment cashlessly via his mobile phone. This option is suitable as an alternative to card payments.
How do I set up a transfer payment via QR code?
1.Go to Application settings » General and add your bank account number in the Company information section.
2.Open Payment settings and add the payment method Bank Transfer.
3.Now, in the Print settings, in the Printing receipts print job, enable the Print QR payment code on bank transfer receipts option.
4.Markup the products and close the order using the Bank Transfer payment method.
5.Verify that the customer has scanned the QR code from the receipt and made an immediate payment.
 |
 |
|
•The format of the entered bank account is validated. Therefore, if you do not print QR codes on your receipts even if set up correctly, check the correct account number with the bank number after the slash. •The QR code is not printed on the receipt even if you have the Print receipts option Mini receipt enabled in the print task. |
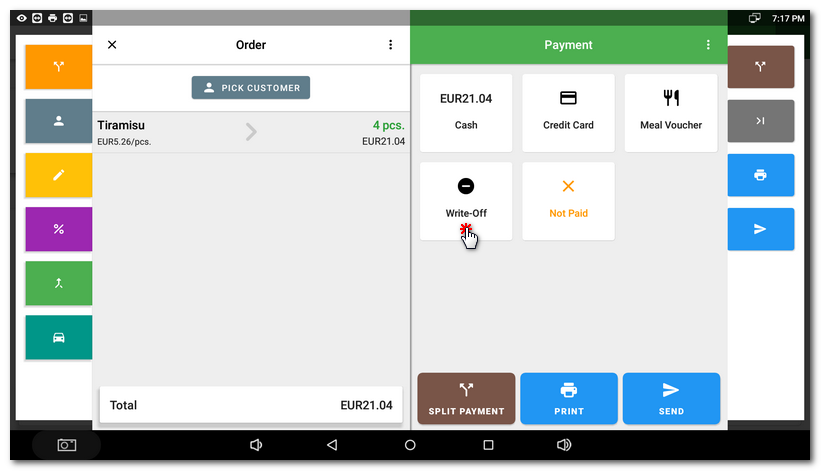
Products and ingredients Write-Off
If you are using Ingredients, Dotypos offers also to write off the used ingredients. Write off is the standard payment method in the Dotypos. After adding this method, you can simply deduct items from stock (e.g. when a drink is spilled) directly from the payment dialog. By issuing an invoice using the Write-off payment method, all items sold are deducted, including set ingredients. However, a proper receipt is not issued, but only a confirmation of the deduction made, which does not affect the cash register sales and VAT in any way.
After the items are issued using the Write-off payment method, the movement will also be correctly recorded in the warehouse application.
How do I write off products and raw materials?
It is very easy:
1.In the Application Settings, activate the payment method Write-off in the Payment Settings section.
2.Then you can also find this payment method in the Payment dialog.
3.Charge the products you need to Write-Off and “settle” the order using the payment method Write-off.
4.The products will be depreciated, including the ingredients.