The possibilities of the payment dialogue in Dotypos are wide. With appropriate settings, you determine what should happen after the bill is issued. If you want to save time as much as possible, you can simply register the received amount by tapping on the displayed values of banknotes and coins or add quick actions to the bottom panel. Any tip can also be entered before final payment. In the case of supported payment terminals, you can leave the tip entirely up to the customer. When paying by card, the terminal itself offers to enter the tip. The most common scenarios for using the payment dialog are shown in this chapter. The individual scenarios (settings) listed here can of course be combined.
You can enter the amount received simply by selecting specific notes and coins. This is much faster than typing the amount on the numeric keypad. The following settings will therefore display a list of defined notes and coins in the payment dialog, which the operator will use to register the payment.

|
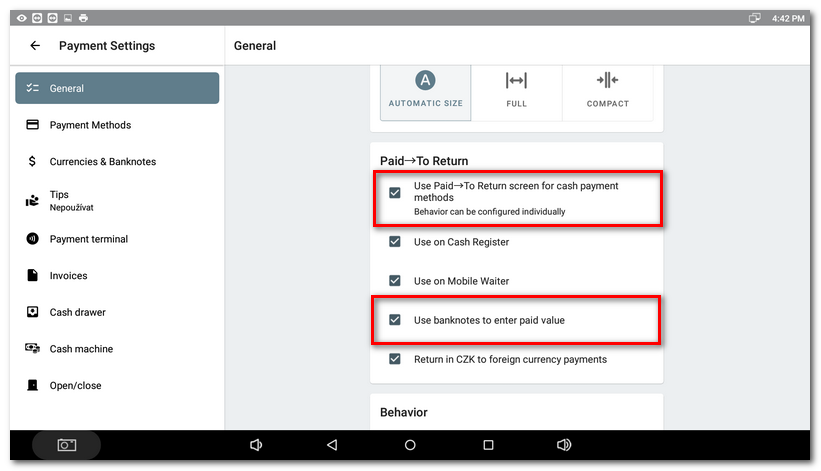
In the Payment Settings, go to the General tab and activate the Use Paid to Return screen for cash payments methods and Use Banknotes to enter paid value options.
|

|
You will also find the Use Banknotes to enter paid value option the settings for each cash payment method. So instead of enabling it generally, you can enable it only for a specific payment method. However, Use Paid to Return screen for cash payments methods must always be enabled. The setting for payment methods always takes precedence over the general setting.
|

|
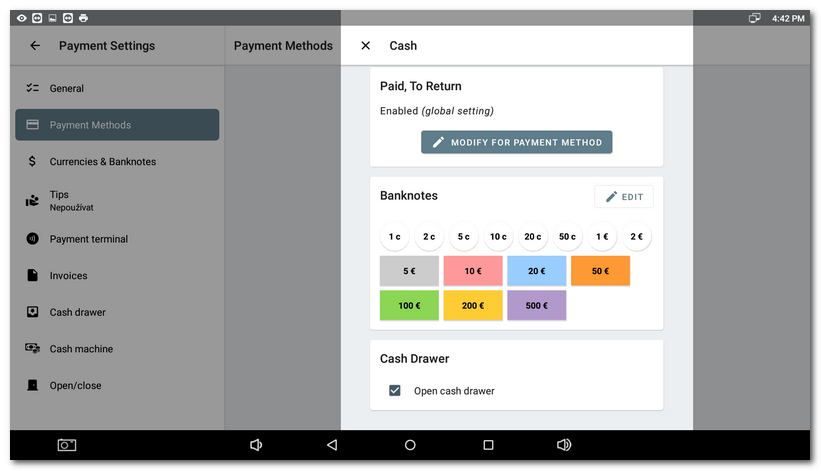
On the Payment Methods tab, tap the  icon next to the Cash payment method and check the correct values of banknotes and coins. Alternatively, use the EDIT button to define your own. If everything is correct, return to the main screen. You can now start marking. icon next to the Cash payment method and check the correct values of banknotes and coins. Alternatively, use the EDIT button to define your own. If everything is correct, return to the main screen. You can now start marking.
|

|
You can add your own banknotes and coins to each cash payment method by clicking on the key icon  and delete the default ones completely. When creating a custom payment method, first enter the value and then the name and color. The operator will then clearly distinguish between the banknotes and coins in the payment dialog. and delete the default ones completely. When creating a custom payment method, first enter the value and then the name and color. The operator will then clearly distinguish between the banknotes and coins in the payment dialog.
|

|
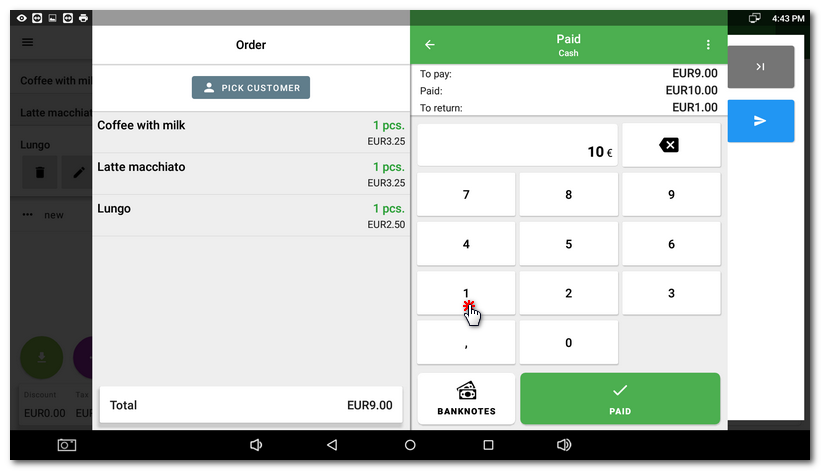
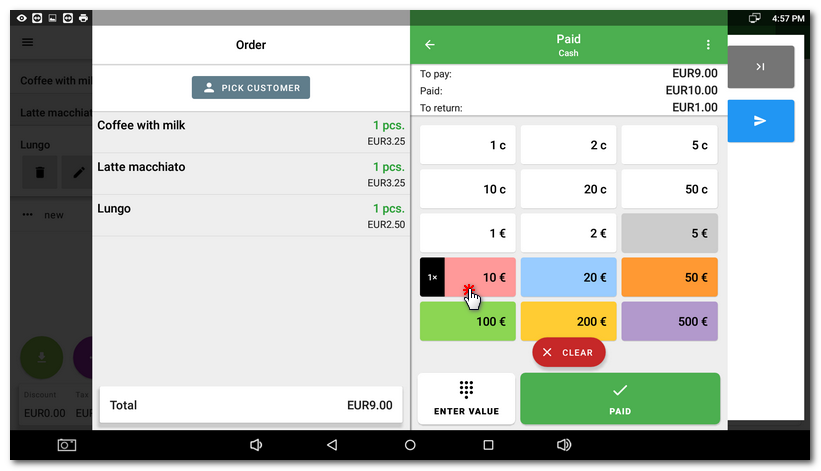
Once you have charged the products and tapped the Checkout button on the main screen, select the Cash payment method. In the next step, tap on the displayed banknote and coin values to record the cash received from the customer. Long tap on the banknote / coin to decrease the recorded number. The ENTER VALUE button can be used to enter cash on the standard numeric keypad. Finally, tap the PAID button.
|

|
There is always the option to enter the amount received on the numeric keypad. Just tap the ENTER VALUE button on the banknote screen (picture above). The cash register will then calculate how much to refund the customer based on the amount entered.
|

|
•The above behaviour can be set separately for each payment method in the Cash payment methods settings on the Payment methods tab. The settings of the added payment method can be accessed by tapping the key icon  . However, in order to set up the Use Paid to Return options separately for payment methods, the general option Use Paid to Return screen for cash payments methods must always be enabled (see next bullet). The recording of the amount received can be limited to the Cashier or Mobile Waiter. . However, in order to set up the Use Paid to Return options separately for payment methods, the general option Use Paid to Return screen for cash payments methods must always be enabled (see next bullet). The recording of the amount received can be limited to the Cashier or Mobile Waiter.
•If you disable the Use Paid to Return option for cash payments in the Payment Settings under the General tab, neither the bill and coin list nor the keypad for entering the amount received will be displayed. Similarly, these elements will be hidden if you turn off the Use on Cash Register / Mobile Waiter option on the Payment Methods tab for the selected cash payment method. |
top
|
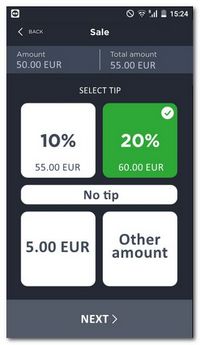
Simply add a step to the payment dialog to enter a tip. Based on the amount to be paid, the cash register will display tip suggestions. Of course, you can also enter your own tip amount or have the customer enter the tip directly on the payment terminal when paying by card. Tipping can be limited to specific payment methods.

|
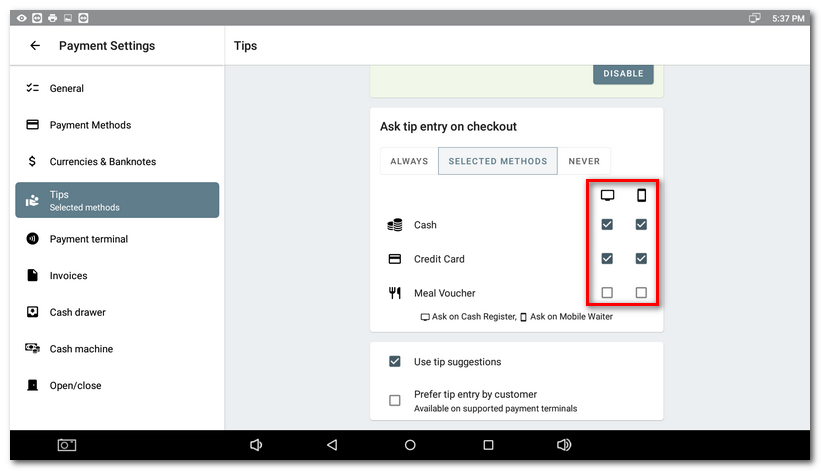
In Payment Settings, go to the Tips tab and tap ALWAYS or SELECTED METHODS at the top. For the selected payment methods, activate tipping separately for the cashier and Mobile Waiter. Next, turn on Use tip suggestions. This setting will allow you to enter tips in the cash register. The Prefer tip entry by customer tip option will redirect the tip to a supported payment terminal so you will not enter it at the cash register. Now go back to the main screen, you can start marking.
|

|
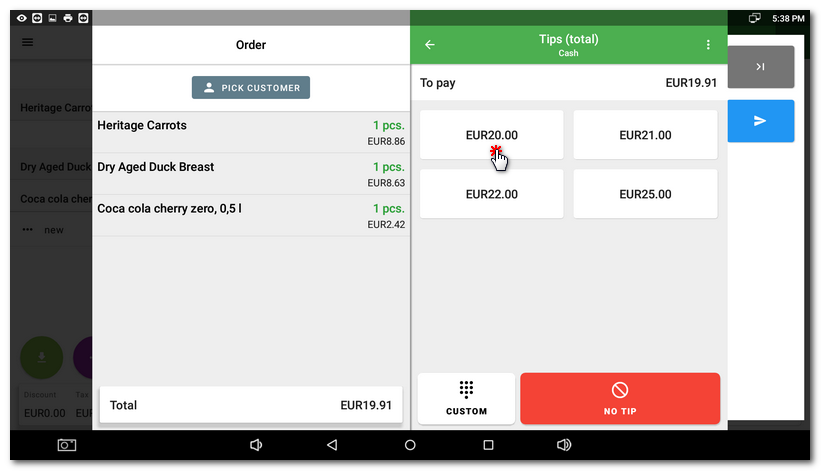
After tapping on the selected payment method for which you have enabled tipping, a dialog will be displayed to enter it. Select one of the suggestions, tap the CUSTOM button and enter your own value on the numeric keypad or continue with the NO TIP button to close the account and mark it as paid.
|

|
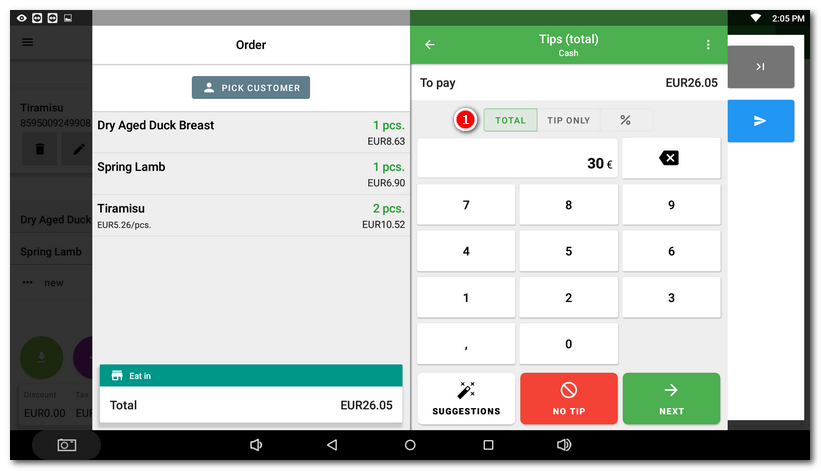
If you enter your own tip, you can select in the header  whether you enter the total amount with tip, just the tip separately, or enter the tip as a percentage. Depending on the option selected, always enter the appropriate amount or value. whether you enter the total amount with tip, just the tip separately, or enter the tip as a percentage. Depending on the option selected, always enter the appropriate amount or value.
|

|
Smart tipping is supported by all payment terminals you connect to Dotypay. In the case of Dotypay terminals, you can configure the tipping screen based on your own preferences. The customer can select from the preset options on the terminal display (tip in %, tip in currency, no tip or another amount entered manually). You can design the appearance of the screen yourself, the screen is not limited by the number of fields. You can edit the tip screen by logging in to the Dotypay portal.
|
Entering the tip after payment and closing the order
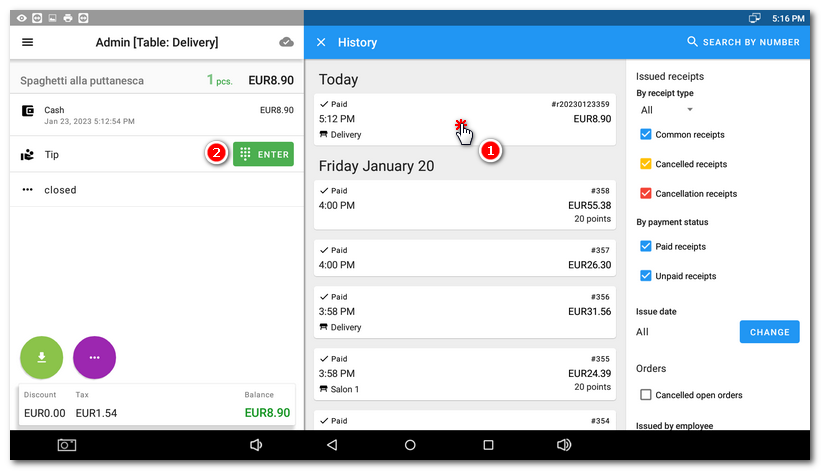
You usually enter the tip amount before you pay and close the order. However, you can also enter a tip after the order has been paid and closed. Simply open your account in History by tapping  and using the button and using the button  to enter the tip amount. This will be added to the account after the fact. to enter the tip amount. This will be added to the account after the fact.

|
There is also a Tips Report available at the cash register where you can filter tips based on a specific day/date or shift.
|
top
|
By default, a payment dialog with a choice of payment method is displayed after the invoice is issued. This step can be skipped if you add the selected payment methods to the bottom panel of the main screen. In addition to payment methods, other actions can be added to the panel, such as selecting a customer and applying a discount. In combination with cash received or tip recording turned off, this can suppress the payment dialog altogether.
Once you tap on the added payment method (in the picture above we added cash and card payment), the payment dialog will open only if you have the receipt or tip recording enabled. Otherwise, the payment will always be recorded directly, the order paid and closed. However, you can optionally open the payment dialog by tapping the three dots icon and selecting a payment method that you have not added in the bottom panel.
You can select a customer or enter a discount at any time before or after adding items to your order. In this case, the discount is always a percentage and is applied to each item in the order.
You can edit the bottom bar in the Payment Settings under the Payment Methods tab. Adding payment method icons and actions is described in this chapter.
top
|
In addition to the domestic currency, Dotypos supports a number of other currencies. So if you accept payment in another currency, simply add it to your payment dialog as another separate payment method. For each additional currency, you specify the exchange rate, with the cashier offering the ČNB rate.

|
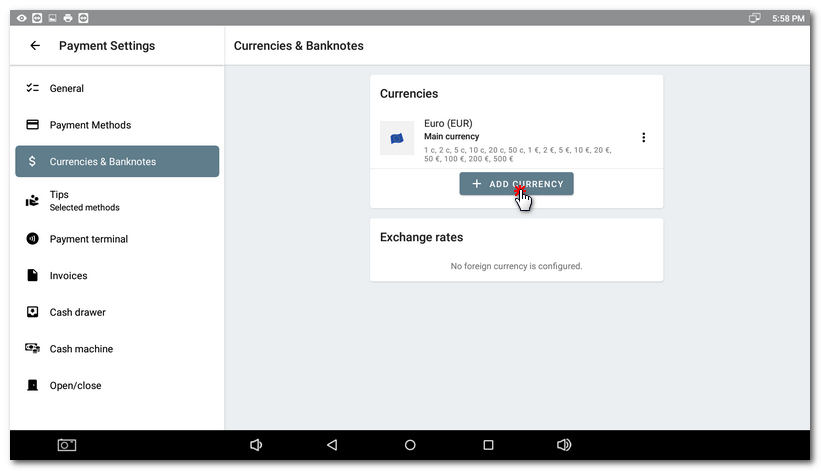
To add another currency, go to the Payments Settings, the Currencies & Banknotes tab and click ADD CURRENCY to add your preferred currency to the list. At the bottom of the screen, an exchange rate ticket is displayed for each currency added, showing the current ČNB exchange rate and the exchange rate set in the cash register.
Use the three dots icon next to each currency to delete the currency, set notes and coins to record cash received, or set the exchange rate.
|

|
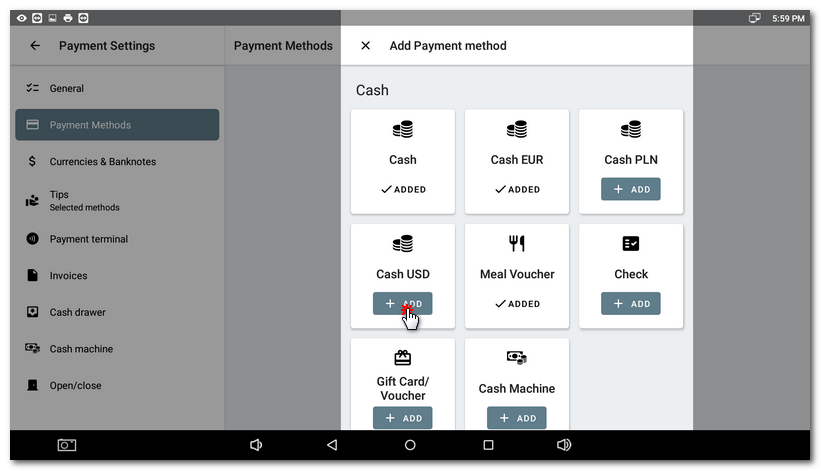
In the payment settings, go to the Payment Methods tab and add the payment method Cash in another currency or currencies.
|

|
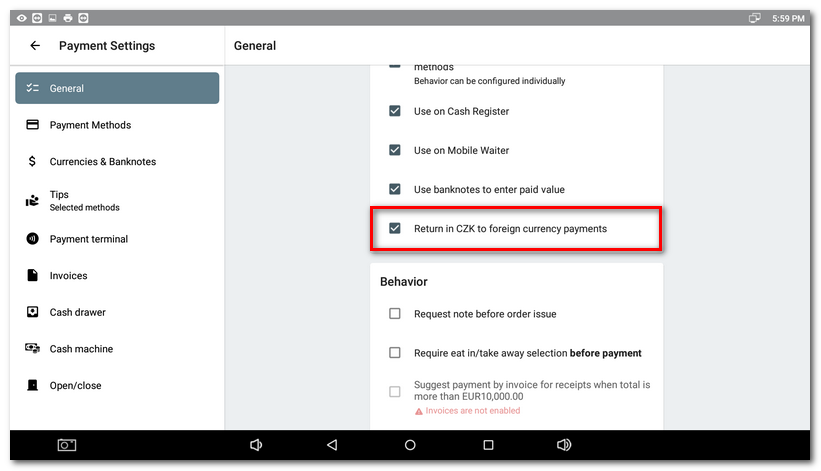
In the payment settings, now go to the General tab and optionally enable the option Return in CZK to foreign currency payments. The cash register will then convert the amount to be refunded into CZK according to the set exchange rate. However, the CZK currency must be added in the previous step and its exchange rate set.
If you will be returning in the original currency, leave this setting off. Now move back to the main screen, you can start marking.
|

|
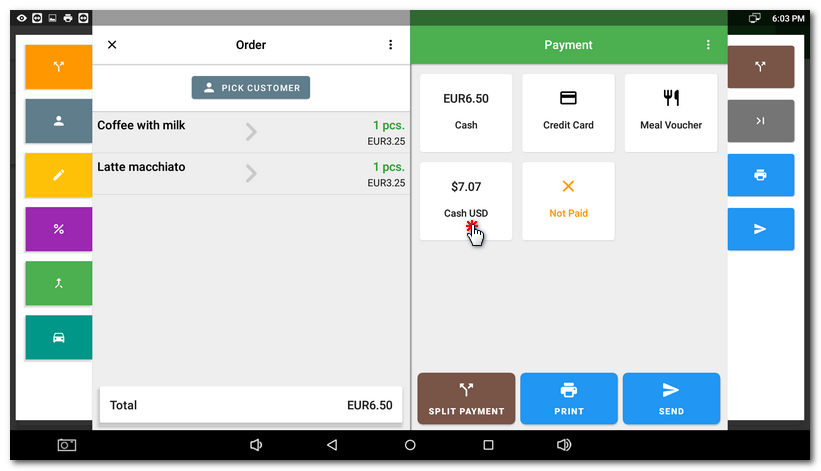
Once the bill is issued, select a payment method with foreign currency. In the next step, enter the amount received in the foreign currency, the cash register will offer the amount to be refunded converted to domestic currency.
|
top
|
top
Back to the payment dialogue
 Retail - records of cash received

 Hotels and restaurants - tips
 Fast payment - quick payment method choices and actions
 Acceptance of foreign currencies

 whether you enter the total amount with tip, just the tip separately, or enter the tip as a percentage. Depending on the option selected, always enter the appropriate amount or value.