When you turn on the touch cash register and run Dotypos, the main screen appears, which is the starting point for all cash register operations. You can find a detailed description of the individual parts of the main screen in the Main screen guide.
The user interface and control panels layout may differ depending on the device used to run Dotypos and its properties. The main screen and application control panels adjust the display size. On mobile phones with a display smaller than 8", Dotypos switches to mobile view.
Billing with specific options entered
|
The touch cash register’s user interface is displayed below. When you start operating the cash register, the first step is always to open it. How to open and close the cash register is explained in this chapter. |
|
If, during the cash register activation, you selected the establishment type Shop, or in the Display settings you switched the POS mode to Instant sale, in the main part of the screen you will not see the Product panel represented on the figure below by a number, |
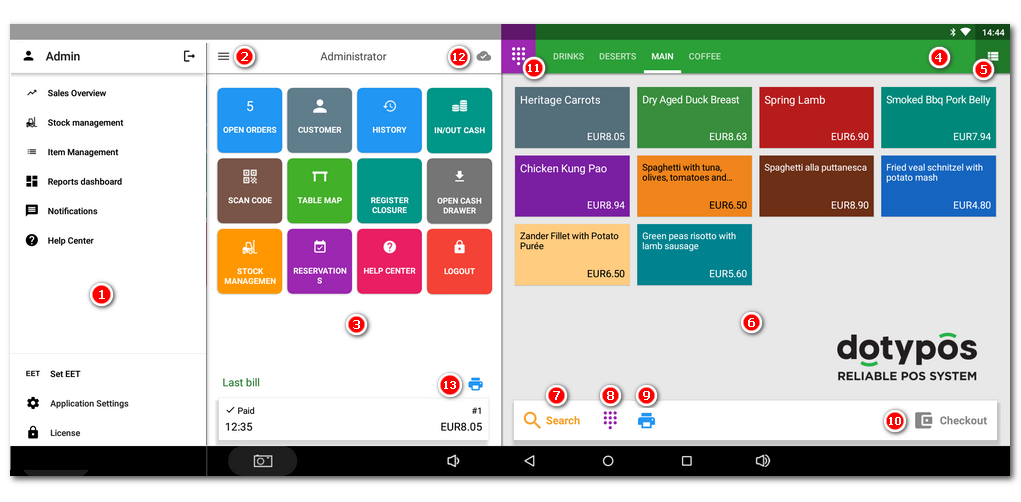
Main screen and basic operations with cash register
|
Side menu - Entry to the advanced settings of of Dotypos, or to sales overviews or reports. You can also find there the option Item management, which is used to create products and their categories. Click on the icon License This will display the actual license type and the license code associated with this cash register. |
||
|
The side menu icon - Side menu can be displayed by clicking on this icon. This section also displays the name of the user logged in. If the user is labelled as an independent seller, his/her name will be highlighted. |
||
|
Tile menu - Contains the buttons for basic cash register operations. In the bottom part, the last closed or open order and the sum of the currently open order are continuously displayed. A description of individual buttons can be found in this chapter. Once you charge a product, the tile menu disappears and you will see the currently open order. Clicking on the items in the order lets you adjust their properties and quantities. |
||
|
Panel of categories - Displays created product categories. You can move this strip horizontally using your finger. |
||
|
Category list icon - If you have a large quantity of categories, this icon displays them as a transparent tile. |
||
|
Panel of products - Tapping on the selected category displays the products belonging to this category in this section. Clicking on the product records it. As soon as a product has been recorded, it will be displayed on the left as an item in the order. Clicking on the items in the order lets you adjust their properties and quantities. You can move products horizontally using your finger. You can change the behaviour of this part of the screen by selecting your preferred POS mode.
|
||
|
Searching - Tap on the icon to display the dialog for the full-text search of products. |
||
|
Searching by PLU codes - Tap on the icon to search products by PLU code. |
||
|
Printing order statement - Tap on the icon to print a statement from a order without having to close the order. To be able to set-up print a order statement, a Print order statement job must be added to the printer in the Print Settings. You can also print a checking order statement from the Order options menu. The icon to print a statement will only appear if you have added items to your order or opened a parked order. You can use the order statement as interim information for the customer before closing and paying the account. |
||
|
Issue order - Tap on the button to display the Payment dialog where you can settle the order. You can add additional payment method or action buttons to this panel to speed up bill payment. |
||
|
Displaying PLU keyboard - Tap to show the keyboard for entering the numeric PLU code. How this icon is displayed depends on these settings.  |
||
|
Data synchronization - Data synchronization between the cash register and Dotypos Cloud is done automatically after each operation. The cloud icon indicates synchronization in progress. When the Internet connection is not working, the cloud icon is red. |
||
|
Print last bill - Print a receipt from the last closed order whose value is displayed here. All closed orders can be found in History. If you prevent the user from accessing the History using user rights, he/she will not be able to print the last account via this icon. The display of this button affects this setting. |


 . Tap on that icon to display the screen with the

|
When you tap and hold your finger on a selected product tile, you will see information about the current stock, the amount of the item in open orders, and allergens (if selected in the product properties). If you have any active courses, you will be able to select the appropriate course as well. OPEN THE STOCK button takes you directly to the stock card of the product, where you can make the stocking up. Available only in Dotypos FULL and higher. 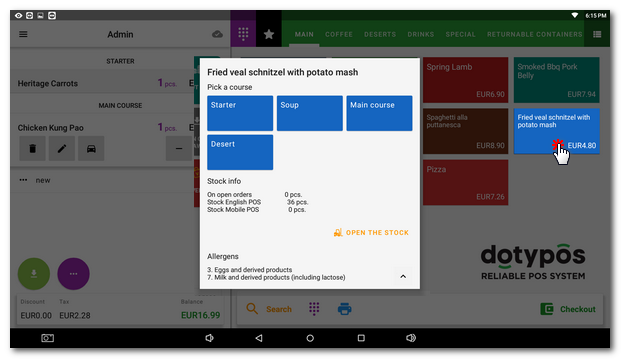 |
How do I bill in Dotypos?
1.In the main screen, click on the product selected  from the chosen category
  (see the main screen picture above). By repeatedly tapping you add the product quantity to the order. The charged products are added to the right side as order items, see Charged product screen below. You can modify the order items in future.
2.If you do not need the products created in advance, you can bill using a simple calculator called Instant sale.
3.Another alternative is simplified accounting, where instead of the product tiles, the category tiles will be displayed first and then the products after selecting the category.
4.Once the products have been charged, click on the button Issue order  . It will display the Payment dialog where you can make the final order settlement.
|
If the customer has filled in an e-mail address in their account, the cash register will automatically send the receipt to this e-mail address. This behavior can be changed in the payment dialog. |
Charged product screen

You charge products simply by choosing the category and clicking on the selected product. An order opens on the left side of the screen. If you click on the right-hand side product more times, the appropriate amount to be charged for it will be recorded. You can also set the quantity with the buttons .
Clicking on the product(s) in the open order displays the button for adjusting them. To delete the product from the order click on  . Use the button
  to adjust or display charged product properties. This lets you adjust the quantity, price or granted discount for a specific order and displays notes on the product. The button
  allows switching between sale here and takeaway sale. Below the charged products, the order status may be displayed
  , showing whether it is a new order or a parked one.
Use the button to park an order and leave it open. You can go back anytime later and charge more items. However, you can also assign this button to cancel the currently open order or hide it in this setting. If the order is parked to any table, there will be a button  to easily open another new order at the given table. Click the button
  to display the menu of other operations with the order. If you have activated the Table map , the order is automatically parked in the table to which the order belongs.
Use the button Checkout to display the Payment dialog and settle the order.
|
•For closed and paid orders, it is possible to change the payment method used to paythem in the History. •In the Print receipts print job, you can optionally turn on mini-receipt printing to help save thermal paper. •In this setting, you can activate print on demand and print the receipt only on customer request. •For more information on the different options for printing receipts, see this chapter. |
Empty order
If you remove all items from the order, it will be empty. In such cases, either return by clicking Back or use the button for the next cash register operation and cancel the account or park for adding an item later.
You also begin with an empty order if, in the Table Map, you tap on the table without any open order or you create a new order at the table. If you now use a standard sequence to charge products, these products will be added to this open order for the table concerned.
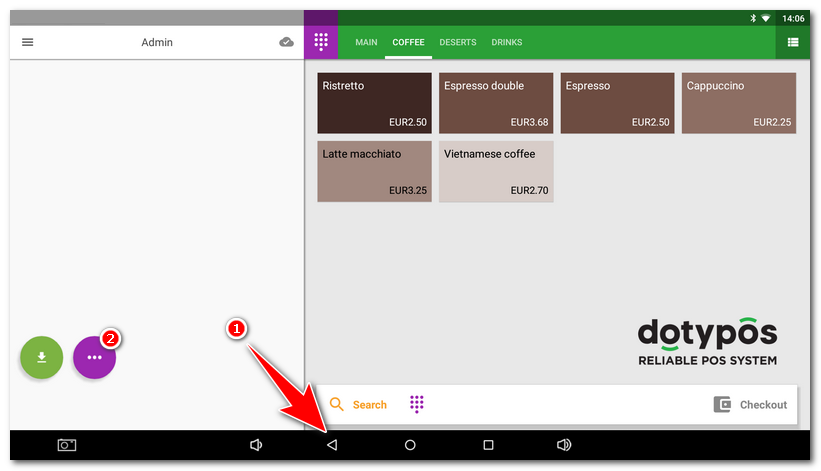
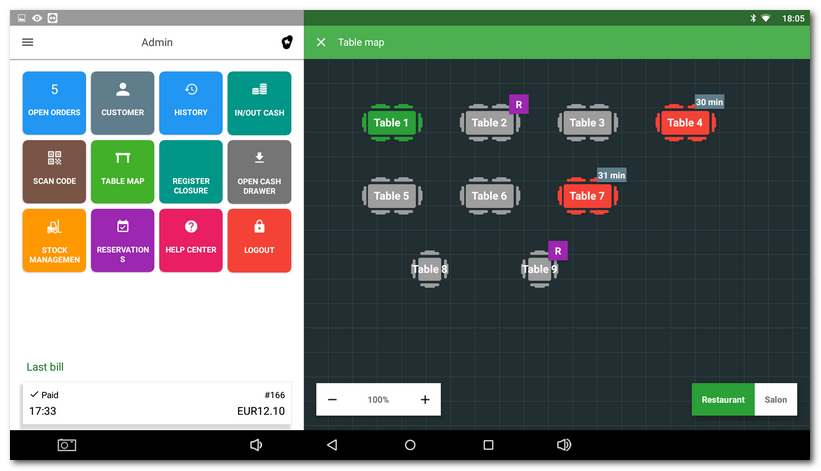
Table map screen
If the Table map is active, it can be displayed on the main screen instead of categories and products or open orders. The display can be changed in these settings. Click on the map to select the desired table and then charge products to this table.
If the selected table is booked in the Reservations app or is about to be booked, you will be notified and Dotypos will offer to assign the customer with an active reservation.
Once you finish charging, the order can be closed or parked, and you can go back to the Table Map. On the map, the table with an open (active) order is highlighted in color corresponding to the order duration with the duration time. On the bottom of the map, you can find buttons to change the scale or to go to the next map page.
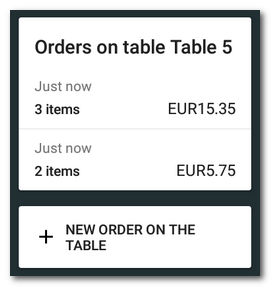
Long click on the table to display currently open orders at this table. Click on the selected order to display it with the option to close it. You can also open a new order at this table directly.
Information about the time since the last order adjustment on the Table Map
One minute after parking, every order starts displaying the time since the last order adjustment. This information gives the crew an overview of the period since the last service was provided to guests. According to the time set, the table color changes from green to orange and then to red. So you get a simple message that the table was not served for a long time. You can change the time interval, or even switch the feature off, in Table map settings.
|
If you use the Table Map, you will benefit from the easy reservation system that allows the creation and registration of reservations using an easy application. For more information, see the chapter Reservation. |
|
If you distribute your products to the customers, you can use the special table for distribution and get the information on overall sales for distribution. You can find more information about this option in this chapter. |
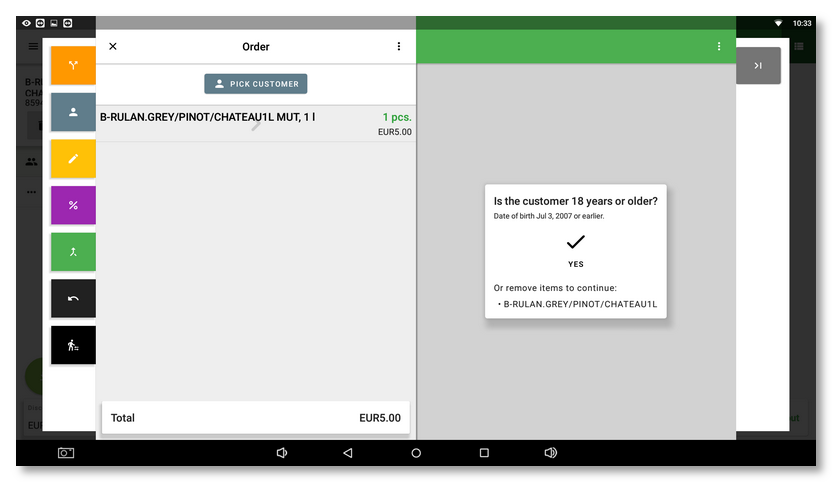
Verification of customer age
In the settings of each product, you can specify the age limit for selling it. Then, in the general cash register settings, you can specify in which case you want to show the operator a warning to verify the age of the customer.

You can set up a notification immediately when you add an item to an order or before you issue a bill (pay the entire bill), i.e. after you press the Checkout button. If the customer does not prove the age, close the payment dialog and remove the billed product from the order. In case of warning before adding the item to the order, just select NO and the product will not be added to the order. A warning will also appear for age-verified products if you split the items on your bill for payment separately.