» Available only in Dotypos FULL and higher. «
|
 The Shoptet add-on can pair products and warehouses in your e-shop with those in the touch cash register. After successful connection the sales realized through the e-shop are transferred into Dotypos as warehouse operations. The add-on uses the Shoptet API.

|
This option is available only if the cash register connected to the cloud has the location set to Czechia.
|
A short connection sequence:
1.Assign unique EAN codes to individual products.
2.Install the Dotypos add-on in Shoptet and connect it with the cloud.
3.In the add-on pair the warehouses in Shoptet with warehouses in Dotypos.
4.Run the synchronization of warehouse balances.
5.Optionally, enable automatic synchronization of selected product properties between Dotypos and Shoptet.

|
•We recommend that only advanced users set up the add-on. For help and support regarding the add-on, please contact us via this form.
•Product pairing between the cash register and virtual shop is based on EAN codes. These codes must be mutually unique. If there are more products with the same EAN code in Dotypos or Shoptet, they will not be paired. So before connecting the e-shop and Dotypos, we recommend to first check whether the EAN codes at both sides are entered correctly for mutual interconnection, possibly also the created warehouses.
•For the proper functioning of the add-on, Dotypos must have created at least one of categories with one product.
•Do not use a slash "/" in the Shoptet ID field, which is automatically added to the field when you create product variations. Shoptet cannot work with this character. The product variants themselves are also not supported by the add-on. If you use them in Shoptet, you need to disable product name synchronization in the add-on settings.
•When pairing stores between Shoptet and Dotypos, the 1:1 ratio must always be maintained. Multiple warehouses in Shoptet must not be paired to the same warehouse in Dotypos. |
How do you connect the e-shop at platform Shoptet with Dotypos?

|
Log in to your e-shop as an administrator. In the administration go to the tab PRODUCTS » Products and in each of the product details activate in the tab Stock the fields EAN code. Fill it with the appropriate EAN and save changes.
|

|
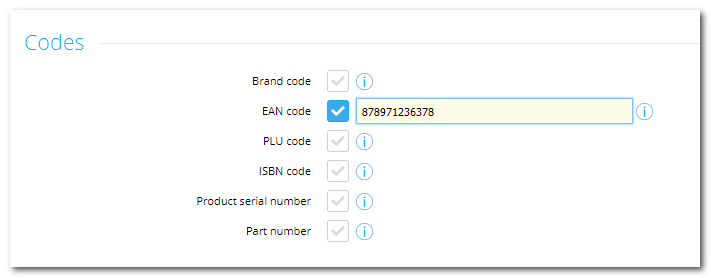
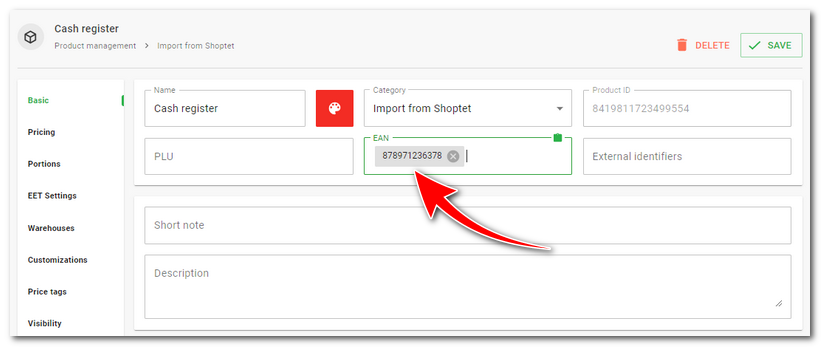
Add the identical EAN codes also into the corresponding products in Dotypos, ideally via the Dotypos Cloud web interface. The field for the EAN code can be found in product details in Basic. Enter the EAN into the field and press ENTER. Do not forget to save the changes with the button in the heading.
|
If you properly prepared the products in Shoptet and in Dotypos as well, go to the next step.
top
|

|
In the administration interface of Shoptet go to the tab CONNECTIONS and open the page Shoptet addons. Here find the Dotypos add-on and install it. After installing the add-on, the page with its configuration will open automatically. Or you can also click on the installed add-on and open its configuration page.
|

|
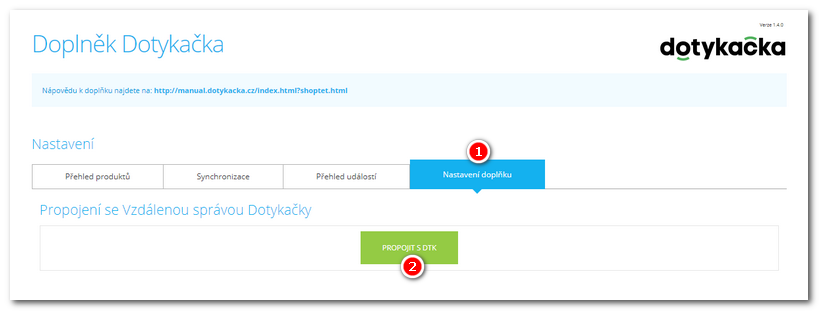
On the add-on configuration page open the tab Add-on settings (Nastavení doplňku)  and then click on the button Connect with DTK (PROPOJIT S DTK) and then click on the button Connect with DTK (PROPOJIT S DTK)  . .
|

|
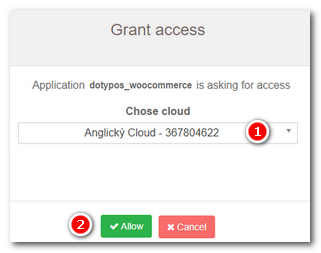
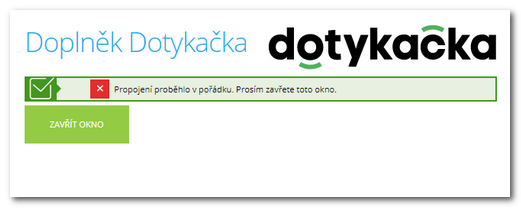
In a new browser window you will see the login dialog of Dotypos Cloud. Log in and then select the cloud to be connected with Shoptet  . Confirm the connection with the button Allow . Confirm the connection with the button Allow  . After confirming the successful connection, close the window by click on ZAVŘÍT OKNO. . After confirming the successful connection, close the window by click on ZAVŘÍT OKNO.
|
top
|

|
On the Add-on Settings tab (Nastavení doplňku), scroll to the bottom and pair the Shoptet warehouses with the Dotypos warehouses. In the left part are listed warehouses of the Shoptet , in the right part select the corresponding warehouses in Dotypos , in the right part select the corresponding warehouses in Dotypos  and save the changes and save the changes
|

|
If you don't see the warehouses in the Pair with DTK (Párovat s DTK) section on the right, refresh the page (F5 key) or on the Synchronization tab (Synchronizace), start synchronizing the warehouses with the warehouses list (SEZNAM SKLADŮ) button.
|

|
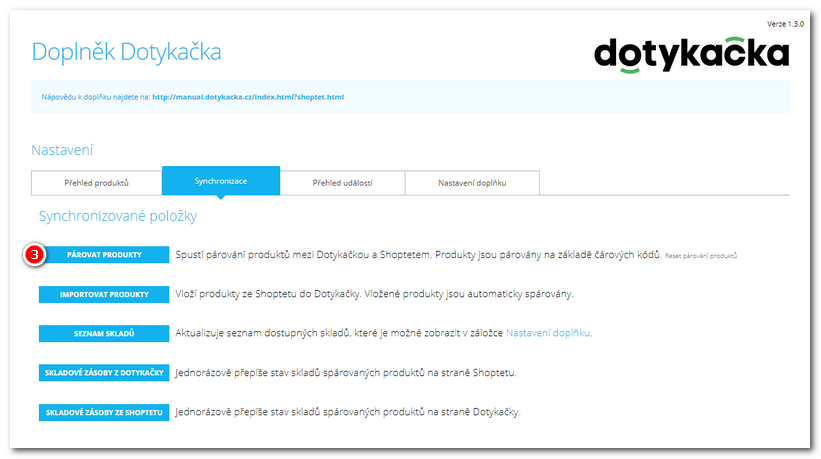
Now you must synchronize your products. On the Synchronize tab (Synchronizace), use the button Pair Products (PÁROVAT PRODUKTY)  . Synchronization may take some time and is indicated by text on the button. The activity of the add-in is then logged on the tab Event Overview (Přehled událostí). . Synchronization may take some time and is indicated by text on the button. The activity of the add-in is then logged on the tab Event Overview (Přehled událostí).
|

|
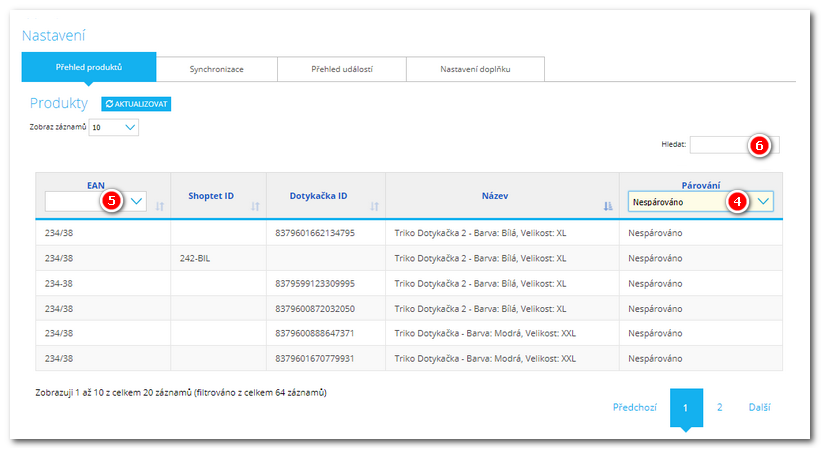
After the synchronization is complete, you will see unpaired and paired products on the tab Product Overview (Přehled produktů). If you do not see the products after the synchronization is complete, use the button UPDATE (AKTUALIZOVAT) in the header above the product list. Use the menu to switch between their views  . For unpaired products, you must add the same EAN code, either in Shoptet or Dotypos, or in both systems if the products do not have an EAN entered. It is on the basis of the EAN codes that the products are paired. After the addition, start the synchronization again. Similarly, you must restart product synchronization after creating a new product or editing an existing product on either side. . For unpaired products, you must add the same EAN code, either in Shoptet or Dotypos, or in both systems if the products do not have an EAN entered. It is on the basis of the EAN codes that the products are paired. After the addition, start the synchronization again. Similarly, you must restart product synchronization after creating a new product or editing an existing product on either side.
In the menu  you can only choose to display products with the same EAN code. If such products exist, you must always set a unique EAN code for each of them. you can only choose to display products with the same EAN code. If such products exist, you must always set a unique EAN code for each of them.
|

|
•Optionally, in the tab Synchronization (Synchronizace) you can perform a one-way import of products from Shoptet into Dotypos. In such case all products from Shoptet that contain an EAN code are imported to Dotypos into hidden categories Imported from Shoptet. The product name, EAN code, measuring unit, price without VAT, VAT rate and currency are transferred into Dotypos. However, the import can be done only after synchronizing the products in step 2.
•If after synchronizing the products any duplications occur, this is caused by using the same EAN codes for more that one product. When you adjust the EAN codes to unique ones, use the button Reset products (Reset produktů) in the tab Synchronization (Synchronizace); the duplications will be removed and a new synchronization will be performed. |
top
|

|
For the paired warehouses, the corresponding webhooks are automatically created in Dotypos Cloud to ensure synchronization of inventory. Advanced users can find an overview of the created webhooks in Dotypos Cloud in Cloud Settings.
|

|
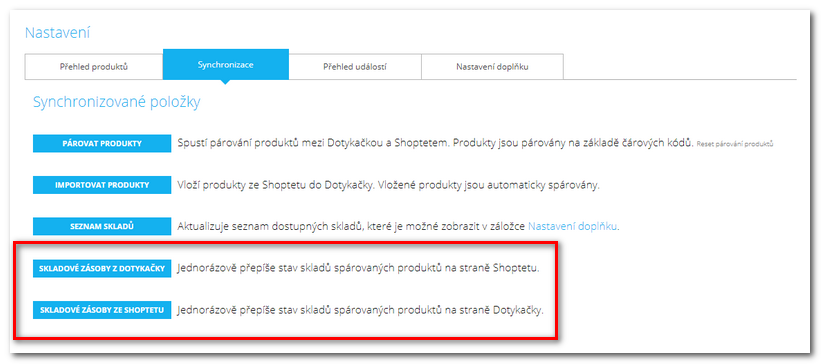
In the add-on settings on the Synchronization (Synchronizace) tab, now start synchronizing the stock. The stock status can be transferred from Dotypos or Shoptet, depending on which system you currently have it in.
|

|
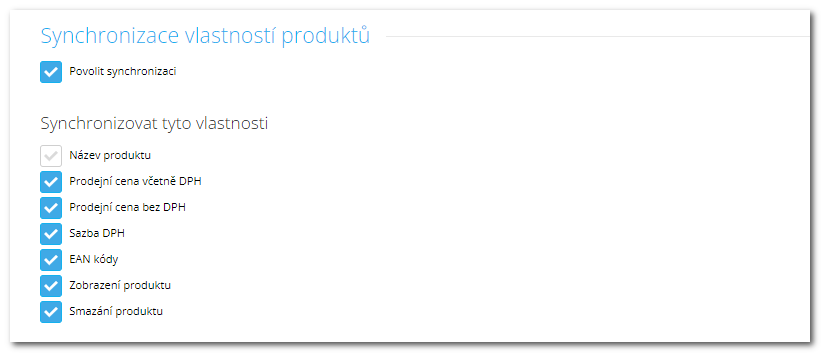
Optionally, you can enable synchronization of selected product properties with each other on the Add-on Settings (Nastavení doplňku) tab. Synchronization is automatically performed every full hour, it cannot be forced. The last change on either side is always transferred. The synchronization settings apply globally to all paired products in the add-on. The Product display (Zobrazení produktu) option corresponds with the Display in selection option in the product properties in Cash register or Dotypos Cloud.
|

|
Finally, go back to the tab Synchronize (Synchronizace) and start the stock synchronization.The balance of warehouse items can be transferred from Dotypos to Shoptet (z Dotykačky do Shoptetu) or from Shoptet to Dotypos (ze Shoptetu do Dotykačky), depending on which system contains the up-to-date values.
|

|
After performing the stocktaking in Dotypos the new balances of warehouse items will be transferred into your virtual shop with help of the add-on.
|
top
|
All done. Now, when selling in the virtual shop, the warehouse balances in Dotypos will also be adjusted. You can verify this in Dotypos Cloud in the item Warehouses » Stock status.

|
If you need to connect the virtual shop with another cloud, go to the add-on in the tab Synchronize (Synchronizace) and remove the connection first; then pair the add-on with the new cloud.
|
top

 Step 1: Adding EAN codes to products
 Step 2: Add-on installation and connection with Dotypos Cloud
 Step 3: Add-on configuration
 Step 4: Synchronizing the warehouses and product properties
 and then click on the button Connect with DTK (PROPOJIT S DTK)
 .
.
 . Confirm the connection with the button


 you can only choose to display products with the same EAN code. If such products exist, you must always set a unique EAN code for each of them.

