How do I add or delete a product?
|
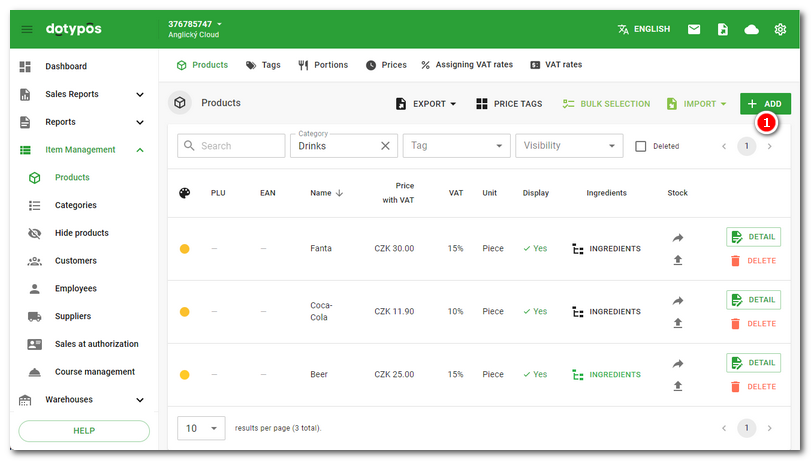
In the item Item management » Products click on the button + Add |
|
The product page will then open. It consists of several vertical items:
Add the required information into each item and then save it all. The new product will be transferred into the cash register in a moment. If you are going to create other products, use the button SAVE AND CREATE ANOTHER. The current product will be saved and then the page to add a new one will open.
In the header of the already created product you will find the DUPLICATE button. This will create a copy of the currently open product, including any Ingredients or stock packs. However, the stock packaging in the duplicated product will not contain EAN or PLU. These codes must be completed. |
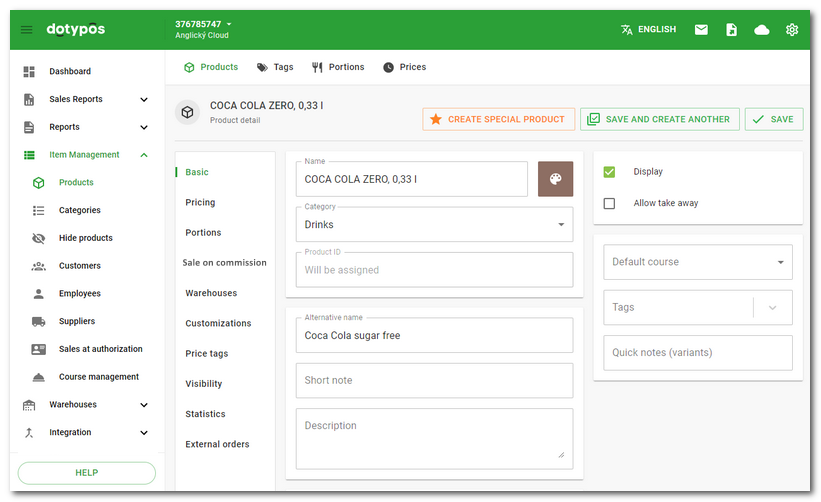
Name |
Enter the product name to be displayed on cash registers. |
Color |
Select the frame color of the product displayed on cash registers. If you first filter the product list in the header by the selected category, any newly created product will automatically include this category and its color. |
Category |
Select the category to which the product will belong. The process for creating categories can be found in the chapter Categories. |
Product ID |
Internal product ID number (internalid), generated automatically |
Alternative name |
An optional product name that (if filled in) is printed on receipts or kitchen orders instead of the standard name. To print on orders, you must edit the corresponding print task. Optionally, its use on generated documents such as invoices can be activated in the cash register settings. The alternative name will also be displayed on the customer display and written into the external ordering systems. |
Short note |
A note is used to add product information (e.g. allergens). This note is printed on the receipt. |
Description |
Detailed product description for the crew. This description is not printed on the receipt, however, it is written into external ordering systems. |
PLU code of the product * |
|
EAN code of the product * |
|
External identifiers |
Customer-identified product (e.g. catalog number) |
Packaging |
Amount of product in the sold packaging. If you enter a value greater than 1, the price per pack will be available in the Prices section in addition to the unit price. |
Unit (for packaging) |
Select the units of the product being sold. By default just 1 piece should be specified there. Only in specific cases, e.g. when using warehouse ingredients, select other units. |
Account code |
Special designation - abbreviation for accounting systems. The account code designation is exported to the Receipts for Pohoda or Money S3 report. |
Preparation duration |
Product preparation time in selected time units. Applies to ordering system with kitchen display and optional recall screen. |
Unit (for preparation duration) |
The unit of time for the preparation time given above. |
Display |
Disabling this option causes the product not to be displayed on cash registers. |
Enables takeaway sales of this product and the applied VAT rate to be selected. |
|
VAT rate for takeaway sales |
Set the VAT rate for takeaway sales. If you leave the default rate, the VAT rate set on the Prices tab is used. It is only displayed if takeaway sales are enabled above. |
Default course |
Select the course with which the product will be marked when deposited into the order. You can learn more about managing courses in this chapter. |
Mark products with tags. Separate the tags with commas. Then the products can be filtered by their tags. If you first filter the product list by the selected label in the header, any newly created product will automatically include this label. |
|
This field lets you write possible product options (e.g. medium steak). At payment, choose the option and the text will be printed on the receipt. |
|
Specify the age limit for selling the product. You may then be notified when a sale is made to verify the age of the buyer. |
|
|
|
* To insert, enter the code and press the Enter key. This lets you enter more codes for one product.
Price input type - Unit |
Product price for individual product. |
Price input type - Package |
Product price for the whole package. This option is available if you set the number of packages greater than 1 in the Basic section. |
VAT |
Select the VAT amount. The displayed values are based on these settings in Dotypos. |
Price with VAT |
Enter the price with value added tax, the price without tax will be automatically calculated. |
Price without VAT |
Enter the price without value added tax, the price with tax will be automatically calculated. |
Use / remove price variants |
Using price levels, you can enter up to 4 additional prices for the product. You can then select a specific price from the entered price levels at the time of sale. More information here. |
Profit |
The value of profit in the currency of payment to be checked or calculated when loading the product. The value entered must be <= the selling price of the product. |
Margin |
The value of the margin in % to be checked or calculated during the product stock in. The specified value must be <= 100%. |
Points |
Enter the number of points to be added after the product purchase to the customer account. |
Require price entry |
Enabling this option requires the price to be always entered when selling a product. |
Require amount entry |
Enabling this option requires the quantity to be always entered when selling a product. |
When the product is charged based on time, Dotypos will automatically calculate the price based on the time and the set units while the order is parked. This is used, for example, to sell services. |
|
Disable group discount |
When this option is active, no discount off the whole order will ever be applied to this product. |
On sale (discount) |
If this option (checkbox) is selected is active, you can enter in the Discount (%) field the current discount from the regular price that will be accepted at the time of sale. |
Discount [%] |
Enter the amount of the discount currently granted for the product. The process for creating temporary discounts can be found in the chapter Prices. |
|
Some items, e.g. VAT and Price with / without VAT, are not displayed if the cash register is set up for VAT non-payers. |
List of created servings (e.g. 50% serving, 50% of the price, 70% serving, 70% of the price) Mark to activate the selected serving as available for the specified product. |
List of Ingredients |
Displays the added products as ingredients that make up the sales product. |
Allows a document (product) to be recorded by someone other than whoever regularly uses the cash register. |
|
Authorizing entity |
Here you select a pre-created entity to which the product will be registered after checkout. |
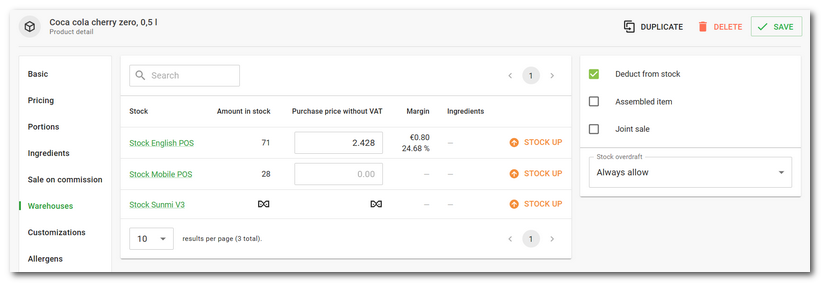
STOCK UP |
Stock up the product into the selected warehouse. |
Deduct form stock |
Disabling this option causes the product not to be stocked out in the warehouse. |
Assembled item |
Indicates the manufactured product. |
By enabling this option you allow the joint sale that is used for selling products together with returnable containers. You will find more information in this chapter. |
|
Stock overdraft |
Enables, disables or displays a notice on the cash register about selling an item that is out of stock. |
In the item Warehouse the actual the product quantity in stock is displayed. By entering the purchase price without VAT and clicking on the button Stock up you go directly to the stock in of the product. If you enter the buy and sell price when stocking, the margin will also be displayed here. Clicking on the selected warehouse name will take you to the overview of the warehouse movements of the given product. |
|
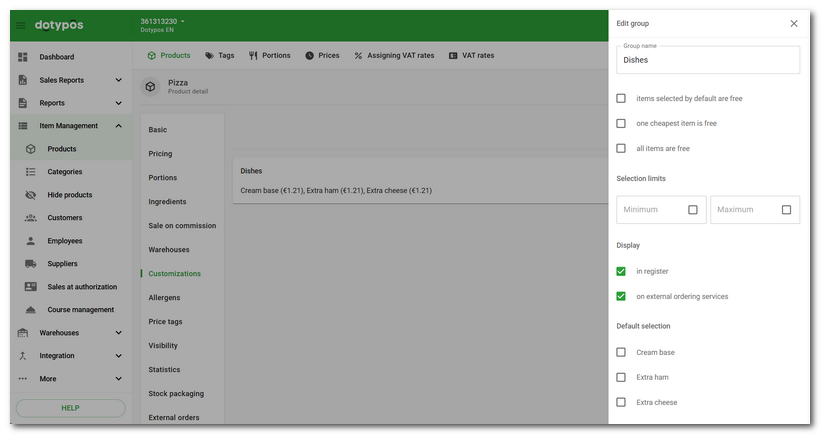
By adding an already created category containing other products, you can create the so-called combination group to be used when billing the main product (e.g. pizza) to also bill additional products, e.g. extra toppings or products for free. Select the category from the pop-up menu first and then click on + ADD GROUP. In the next step, edit the properties of the customization via the pencil button. More information can be found in this chapter.
 |
On this tab you will see a list of allergens and their numerical designation. The marked allergens for the products are transferred to the menu for ordering services. The service can view the allergens on the main screen by long tapping on the product tile. You can assign allergens to multiple products in bulk using the Bulk Selection function. |
Packaging measurement |
Relative number calculated to express the price per desired quantity in combination with Specific units. For example, if you want to display the price per kilo of a 250-gram tub of butter, enter 0.25 here and in Specific units enter Kilogram. This number will be displayed on the price tag. |
Units measurement |
Desired quantity (e.g. kilogram) when calculating the specific price per desired quantity (see the example in the item Packaging measurement). |
For this item you will see the list of all cash registers with an indication whether the given product is displayed on the specific cash register or not. This overview relates to the option for hiding selected products at cash registers. |
In this section you can add the packages that will be used for stocking via Dotypos Cloud or Cash register. Stock packs are suitable for products that you use as Ingredients (you take them out of stock). Typically these are for example beer kegs of 30 or 50 litres, weighed when selling draught beer. For example, a stock product Beer keg may contain 2 stock packs: a 30 litre keg and a 50 litre keg. The Beer keg product is then used as a recipe for the standard sales product Beer 0.5 l. When stocking, you will be able to choose between a 30 and 50 litre keg. If you sell, for example, drinks in bottles with a content of 0.7 l, stock packaging will allow you to stock these products in the given quantity without the need to convert the purchase price into whole units. |
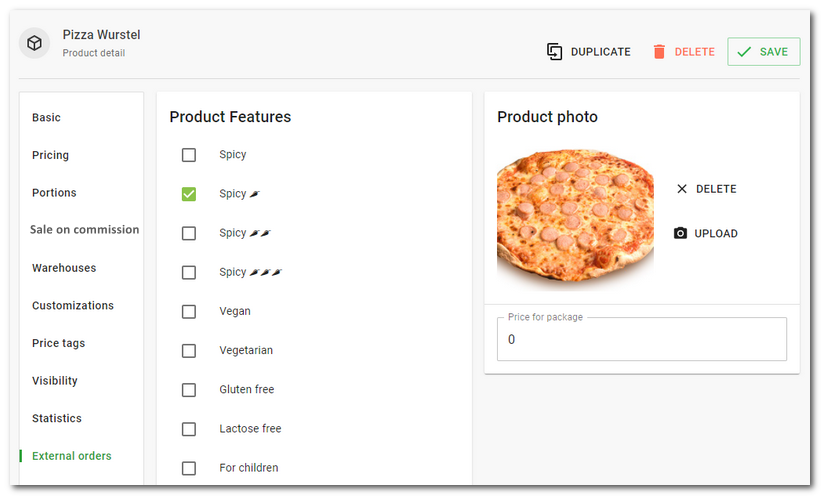
External orders (These settings are valid only for order services. The basic properties are Alternative name and Description.) |
|
Product Features |
Product features or specifications that are displayed for the product in the created quote for ordering systems. |
Product photo |
Product image for ordering services. To insert a product image/photo, click the UPLOAD button. First select the image file, use the mouse to set the preferred square crop and save the changes. |
Price for package |
Price for product packaging for ordering services. Can also be used if you need to increase the price in an external order over the cash register price. |
|
PLU, EAN, External identifiers, Tags and Short notes (variants) can be copied to the clipboard as a text using the icon in the top right corner after dragging the mouse. Then insert it into the appropriate field of the other product with the standard keyboard shortcut CTRL+V.  |
Purchase price in warehouses
The product properties page also contains an overview of the Purchase price without VAT on Warehouses tab. The overview shows the actual amount in stock for every warehouse and the set purchase price. You can edit the purchase price for each warehouse directly in this report. Use the STOCK UP button to stock up the selected product into the warehouse.
|
How Dotypos calculates the purchase price?  Note: Dotypos does not use FIFO to calculate the purchase price. |
|
Enter all the preferred information about the product and then save it by clicking on Save in the upper part of the page. |
|
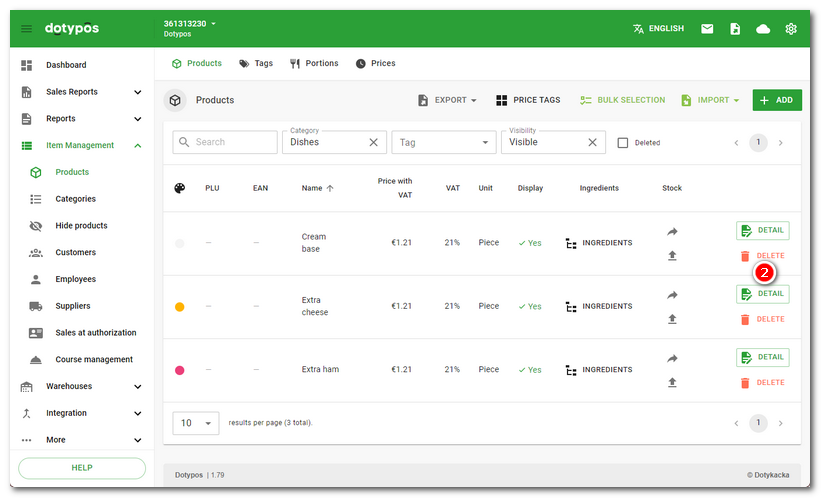
You will find the new product in the product list, where by using the buttons |
|
Instead of deleting the product, it is recommended that you temporarily hide and deactivate it using the option Display. When you create a new product, adjust this hidden one and show it again. |
 .
.
 you can edit it or even to delete. Before deleting a product that is consisting of