Categories allow products to be organized neatly, while streamlining product searches and cash register charging, especially when there are a lot of products. It is recommended to always divide products into categories. Therefore, the first step should be to create categories prior to creating products themselves.
Help function Bulk edit allows you to choose multiple items to be moved to another category, deleted or modified (e.g. the tax rate or other parameters).
|
In Dotypos Cloud, categories can be also batch imported the supplier from the prepared .csv file. This file has the same structure as the file you get when exporting categories from Dotypos Cloud. However, the import and export of items is only supported in Dotypos FULL. |

How do I add or delete a category?
|
In the item Item management » Categories click on the button + Add Using the appropriate buttons in the heading, the created categories can be exported In the section |

 . If you have already added categories (for example by import), edit the category with the button
  and use the button
  to delete it. Only the category will be deleted, the products will remain intact. It will be automatically assigned to the system category
  or
or  . With the button
  you can
  , you can search for categories or limit the display to only selected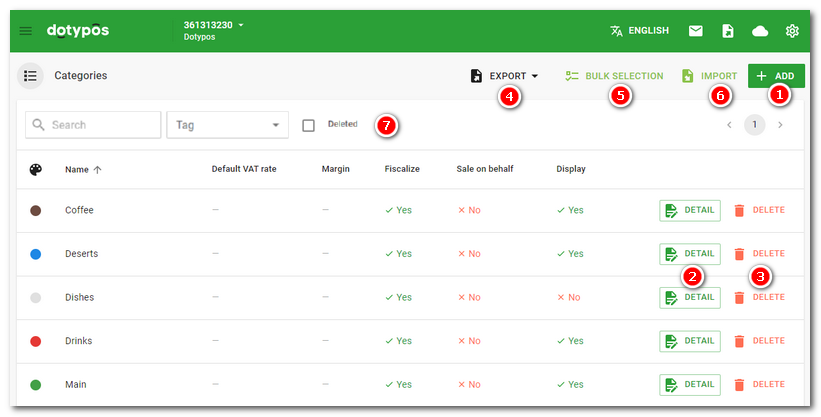
|
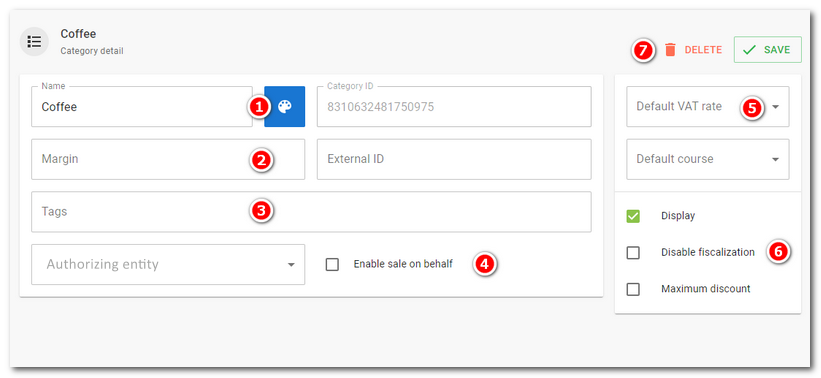
Now specify the properties of the new category, such as its name, color If you need to permanently sell all products in a given category on a proxy basis, first create subjects for sale by proxy, then enable sales in the section For products in the given category, you can select the default VAT rate in the menu In the section Only the name is required for the category. A full description of all category properties can be found below. |

|
Tags for print restriction or routing only work on products. Therefore, if you want to route printing of specific products to a selected printer, you must always use tags directly on the products. Category tags are not supported in this case. |

Description of category attributes
Name |
Category name to be displayed on cash registers |
Color |
If you want to mark off the category, choose its color from the pattern. The default color of a category is generated automatically when the category is created. This color is then also used for products you add to the selected category in the product list. |
Category ID |
Internal category label (created automatically) |
Margin |
The value of the margin (in crowns or percentages) to be checked or calculated during the product stock in from the selected category. |
External ID |
Here choose any numeric category label. |
Tags |
You can add a custom tag to a category. This is useful, for example, when you need to hide selected categories on a given cash register. In the visibility settings you then define which categories will be hidden based on the tags. |
Authorizing entity |
Select the subject for sale by proxy. It will be applied to the whole category if you activated Enable sale on behalf. |
Enable sale on behalf |
Use the switch to activate the possibility to select the EET subject for sale by proxy. When activated, all products in the category will be sold by the chosen proxy. |
The set VAT rate will be automatically applied to the used products from the given category for instant sale. |
|
Default course |
Products in the category can be assigned to the created course. Courses in the cash register can be then simply charged and the information on preparing each course will be sent to the kitchen. |
Display |
With this switch, you determine whether the category will be shown or hidden on cash registers. Hiding a category is useful, for example, for a category in which you have ingredients for recipes. You can also hide a category based on a tag in this setting. |
Maximum discount |
After activation, fill this field with the maximum discount value for products in this category that the crew will be able to grant. |