
How many certificates do I need?
One establishment, multiple cash registers
Do you have multiple cash registers in one place, for example a bar and a cash register in the garden? One certificate and the same record-keeping unit are enough, because all cash registers are in the same establishment.
Multiple branches
Do you run multiple branches, for example two cafés in different parts of the city? Then it is up to you whether you use one certificate for all of them or a different one for each establishment. However, you always fill in the record-keeping unit for each cash register according to the establishment where the cash register is located.
Multiple businesses on one cash register (independent sellers)
Do multiple businesses work on one cash register? Typically, this is e.g. a salon where each hairdresser has their own company ID. In this case, each business generates its own certificate in DIS+ and you then upload it to the specific seller in the Dotypos cloud:
•In the Dotypos cloud, on the Cloud settings tab in the EET 2.0 section, you will see the independent sellers under each cash register.
•In the row of the given seller, click the UPLOAD button.
•Upload the seller’s certificate and fill in the record-keeping unit.
Sales are then sent under the certificate of the seller who is currently logged in to the cash register. If a seller works at multiple branches, they can have a different certificate on each cash register.
Setting up sales registration in the EET 2.0 mode consists of two parts:
2.In the Dotypos cloud, you upload the certificate to the cash register and fill in the record-keeping unit number and then check that the certificate is present on the cash register.
What you will need
•A computer with a web browser and an internet connection.
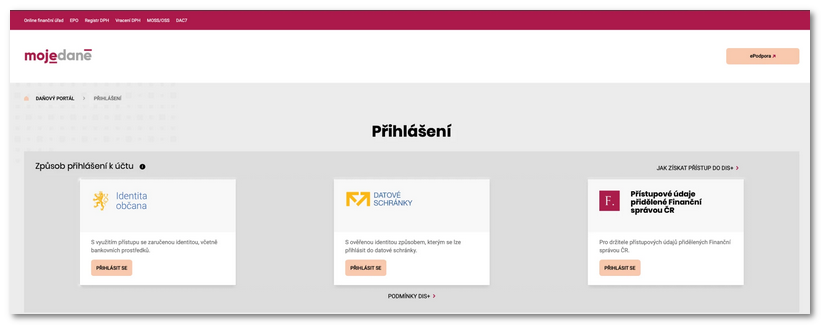
•Access to the MOJE daně portal – login via Citizen Identity (Identita občana – bank identity, eObčanka electronic ID card or MojeID), a data box or login credentials from the Financial Administration – and an active Tax Information Box plus (DIS+).
•Authorization to act on behalf of the subject whose sales you will register (your own DIS+ for self-employed persons, authorization to act on behalf of a company).
•An e-mail address to which you will receive notifications about the issue of the certificate and the approaching end of its validity.
•The noted number of the record-keeping unit that you create in the MOJE daně portal.
•A secure place to store the certificate file (.p12) and its password. Ideally a folder on your computer that you name so that you can find it later. Write down the certificate password securely. If you forget it, you have to generate a new certificate.
•Access to the Dotypos cloud with permission for the Cloud settings » EET 2.0 section.
•A switched-on cash register with the Dotypos application running and an active internet connection.
Part 1: Generating a certificate
|
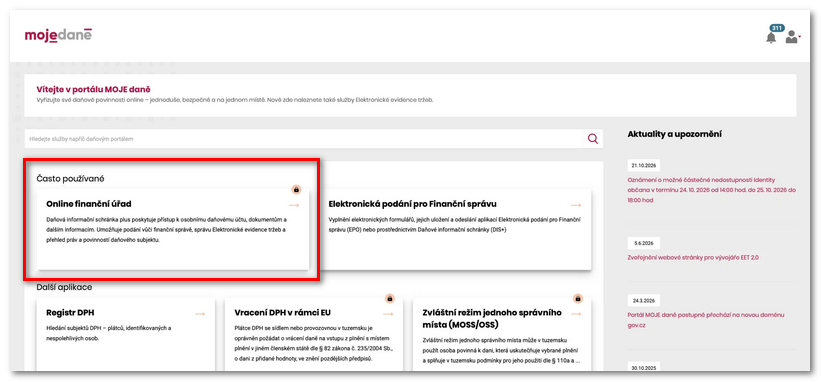
Open the MOJE daně portalOn your computer, open the MOJE daně portal (https://www.mojedane.cz) in a web browser and on the main page click the Online finanční úřad (Online Tax Office) tile. This is your Tax Information Box plus, DIS+ for short. |


|
If your DIS+ is not active yet, click the AKTIVOVAT OSOBNÍ DIS+ (ACTIVATE PERSONAL DIS+) button after logging in. According to the Financial Administration, making DIS+ available can take up to 48 hours. If the Financial Administration does not have you registered yet, registering your details can take up to 5 working days. So do not leave the setup until the last minute. 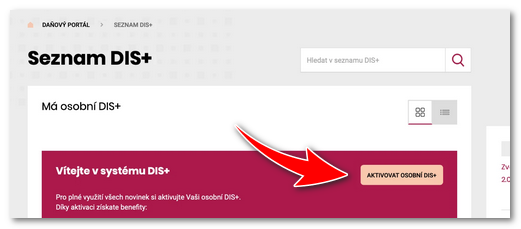 |


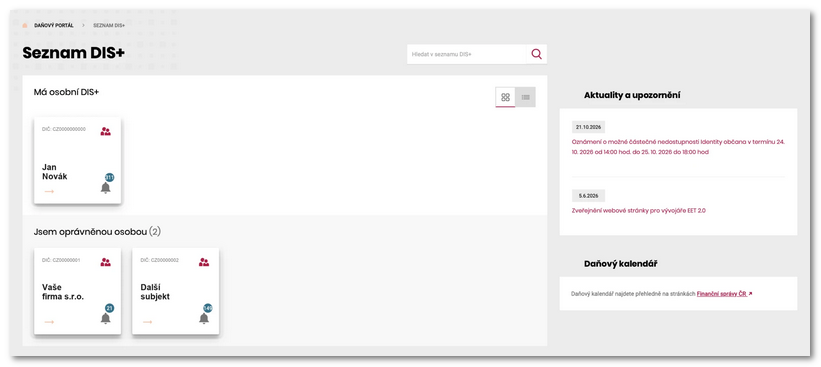

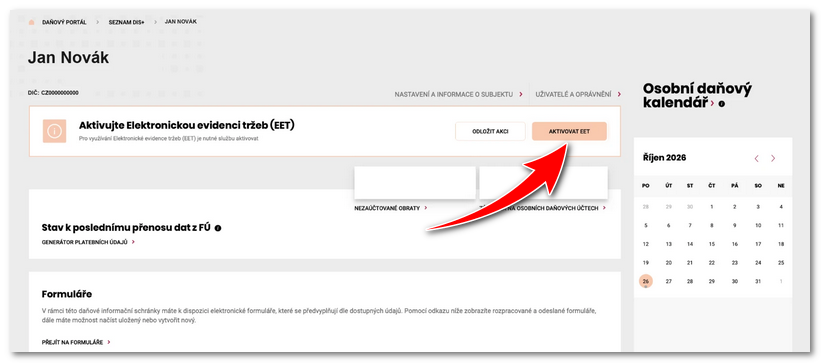
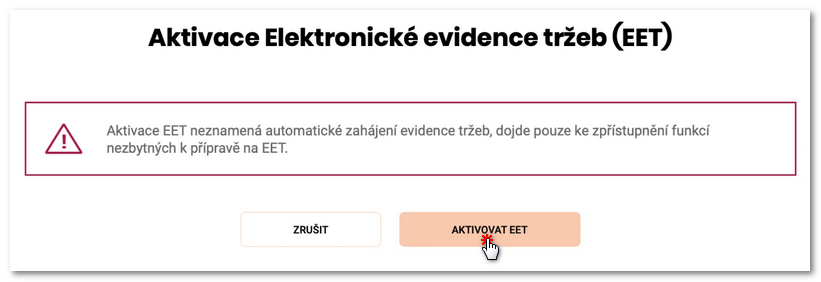

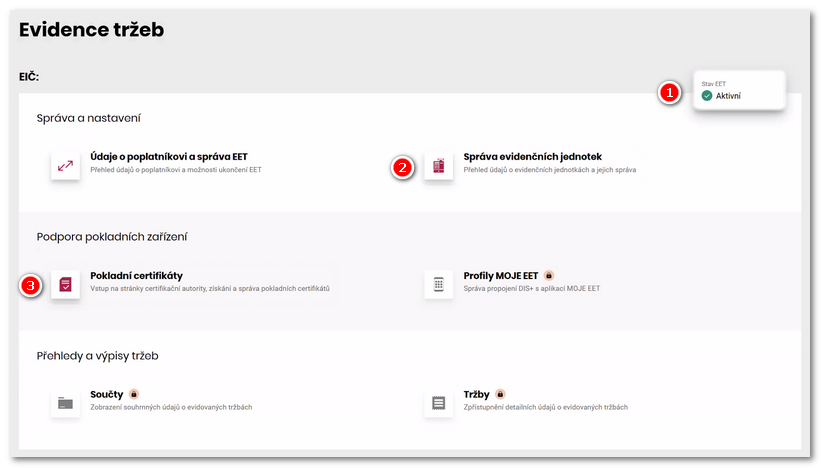
To create a record-keeping unit, click Správa evidenčních jednotek (Record-keeping unit management) and then the NOVÁ EVIDENČNÍ JEDNOTKA (NEW RECORD-KEEPING UNIT) button. If you have more record-keeping units, you can upload them all at once with the NAČÍST ZE SOUBORU (LOAD FROM FILE) button (instructions for importing units, in Czech). |
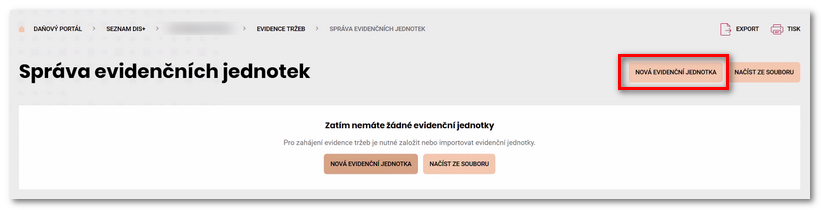
On the page that appears, fill in the unit details in the •Select the DRUH EVIDENČNÍ JEDNOTKY (TYPE OF RECORD-KEEPING UNIT) according to how you sell: Pevná provozovna (Fixed establishment – brick-and-mortar shop), Mobilní provozovna (Mobile establishment – stall, food truck), Automat (Vending machine – self-service vending machine), Internetová stránka nebo aplikace (Website or application – e-shop, sales application), Dopravní prostředek (Means of transport – taxi), Poplatník (Taxpayer). If you do not have an establishment and travel to your customers, choose Poplatník (Taxpayer). •PŘEVAŽUJÍCÍ DRUH PODNIKATELSKÉ ČINNOSTI VYKONÁVANÉ V TÉTO EVIDENČNÍ JEDNOTCE (PREDOMINANT TYPE OF BUSINESS ACTIVITY CARRIED OUT IN THIS RECORD-KEEPING UNIT) – select the main activity you carry out in this unit. The activities are divided according to the NACE classification, but you do not need to know it. Just click the magnifying glass and start typing. •UPŘESNĚNÍ DRUHU PODNIKATELSKÉ ČINNOSTI (SPECIFICATION OF THE TYPE OF BUSINESS ACTIVITY) and NÁZEV (NAME) are not mandatory, but the name will help you distinguish the units from each other. In the next part of the form |
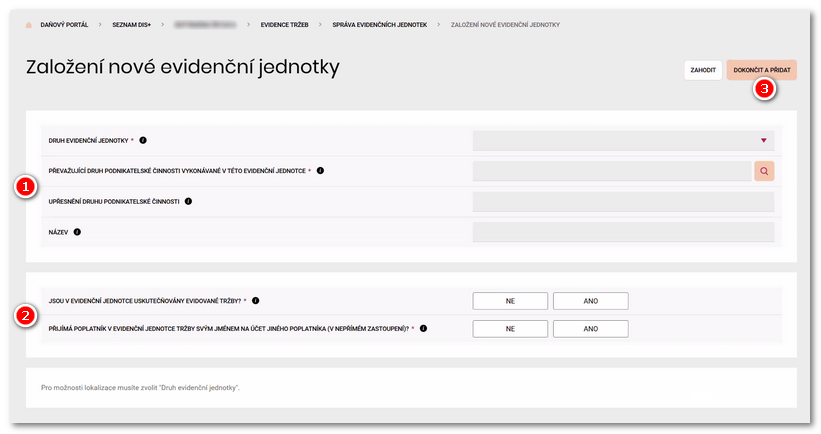
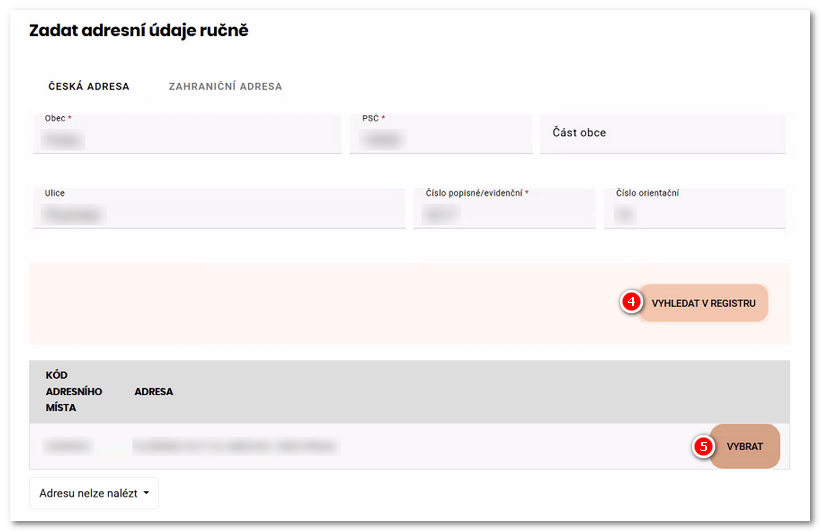
After you select the type of unit, fields for its address are displayed. Fill in the address – Obec (Municipality), PSČ (Postal code) and Číslo popisné/evidenční (Building number) are mandatory. The fastest way is to start with the street and building number; the rest of the address is filled in automatically. Click VYHLEDAT V REGISTRU (SEARCH IN REGISTER) |
|
You can find more details about record-keeping units in the Financial Administration leaflet (in Czech). |

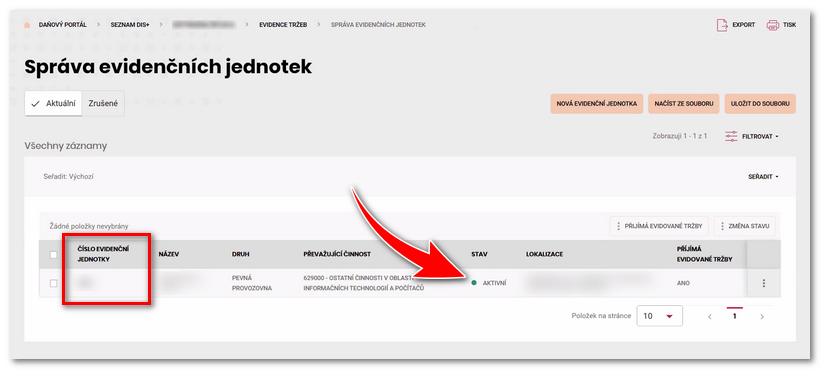
The new unit appears in the Správa evidenčních jednotek (Record-keeping unit management) list with the status AKTIVNÍ (ACTIVE). In the Číslo evidenční jednotky (Record-keeping unit number) column, you will find the number assigned to it by the system. Create all other record-keeping units you need in the same way. Write down the number(s) of the record-keeping unit(s). You will need them when uploading the certificate to the Dotypos cloud. |

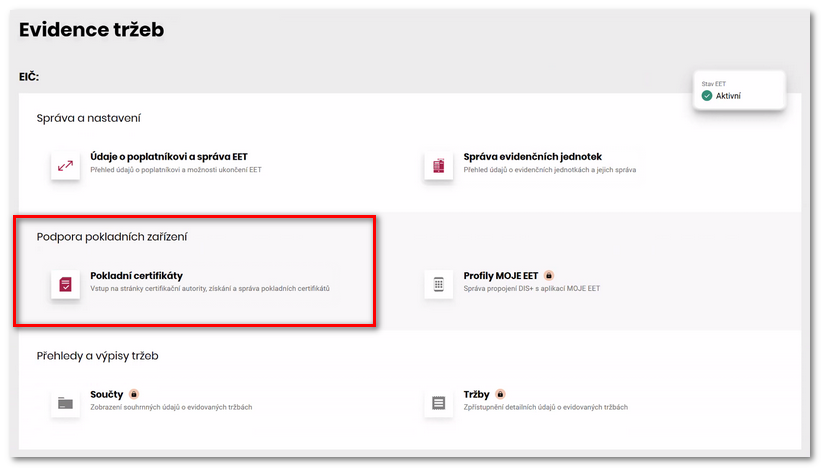
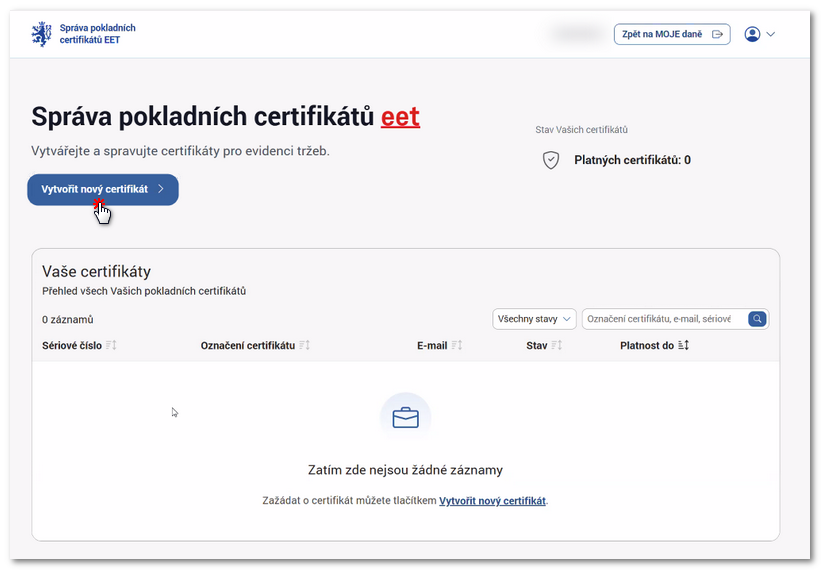
In the dialog that appears, fill in the certificate details: •E-mail pro upozornění (E-mail for notifications) – you will receive a message when the certificate is ready and a notification before the end of its validity. •Označení certifikátu (Certificate label) – not mandatory, but it will help you recognize which cash register or establishment the certificate belongs to. Then click the blue Vytvořit certifikát (Create certificate) button in the dialog footer. |
|
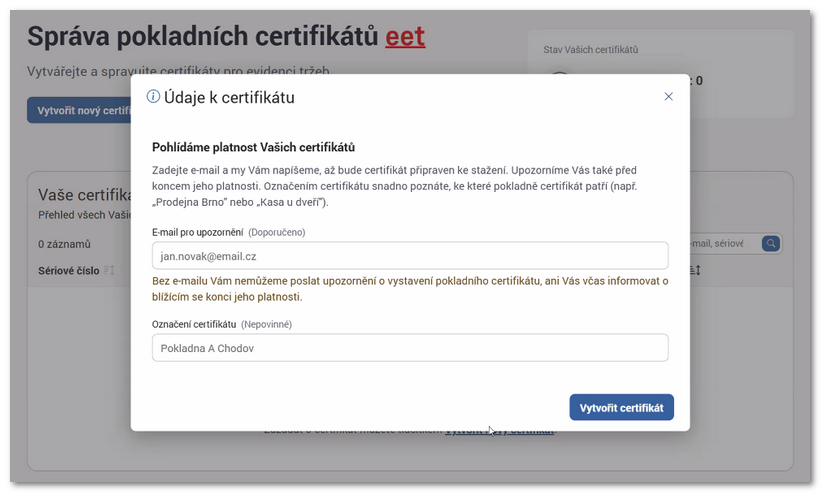
The certificate is usually created immediately. However, when the portal is busy, the request waits in a queue and you will be informed about the finished certificate by e-mail. You can close the certification authority application in the meantime; you will then find the certificate in the MOJE daně portal in the list Vaše certifikáty (Your certificates) in the application Správa pokladních certifikátů EET (EET cash register certificate management). |

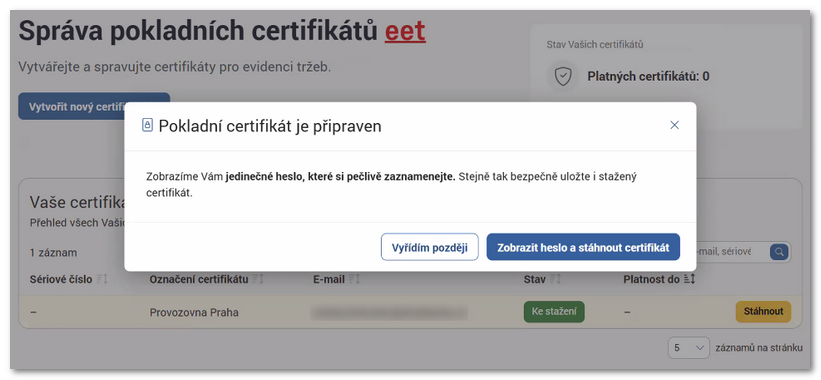
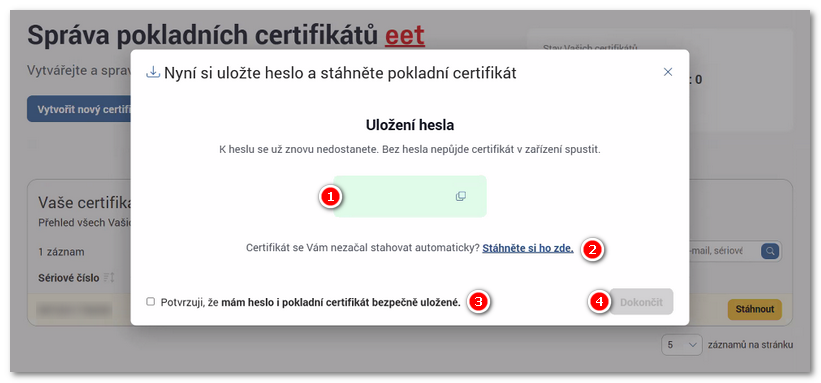
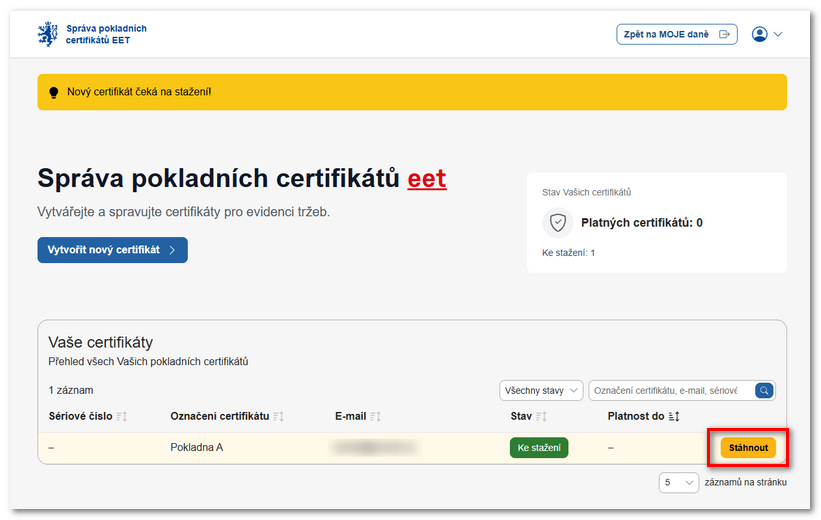
The certificate password is displayed in the green field |
 button.
|
You cannot retrieve the password or the certificate file later, and you cannot upload the certificate to the cash register without the password. If you lose the password or the certificate file, generate a new certificate and invalidate the original one for security reasons. |

In the Vaše certifikáty (Your certificates) list, the new certificate now has the status Platný (Valid) and next to it you can see the date until which the certificate is valid. |
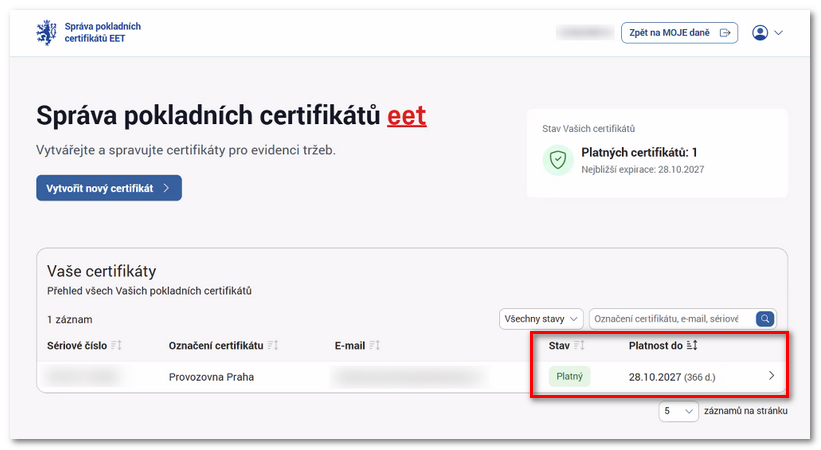
|
The number of certificates is not limited. According to the Financial Administration, it is up to you whether you use one certificate for all cash registers or generate a separate certificate for each cash register. See How many certificates do I need? |
Part 2: Uploading and assigning the certificate to cash registers
To upload the certificate to the cash register, you need to have the following ready:
1.A certificate generated in the Financial Administration portal and downloaded to the computer from which you log in to the Dotypos cloud.
2.The noted password for the downloaded certificate.
3.The number of the record-keeping unit you created in the Financial Administration portal.
4.A cash register with an active internet connection and working synchronization with the Dotypos cloud.
So if you already have the generated certificate downloaded to your computer, its password written down and the number of the created registration unit, follow the steps below and upload the certificates to the cash registers.
1.Uploading the certificate to the Dotypos cloud and assigning it to cash registers
2.Overview of uploaded certificates
3.Verifying the certificate on the cash register
Uploading the certificate to the Dotypos cloud and assigning it to cash registers
|
Log in to the Dotypos cloud, in the left tab panel open Cloud settings and click the EET 2.0 |
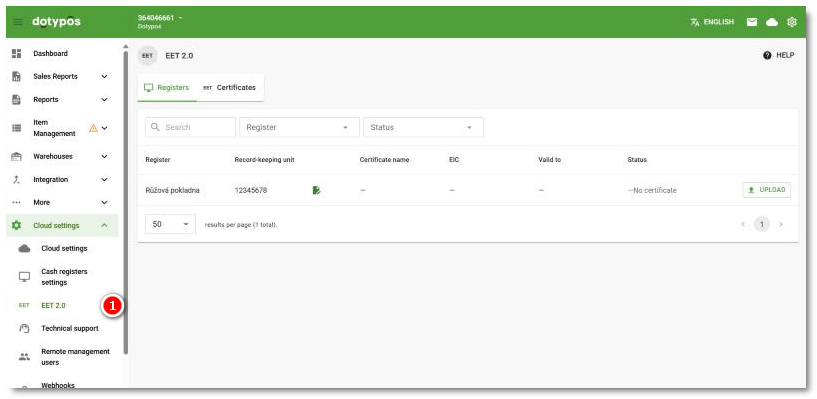
|
For the cash register to which you want to upload the certificate, click in the Record-keeping unit field and enter the number of the registration unit created on the Financial Administration portal. Save the number with the SAVE |
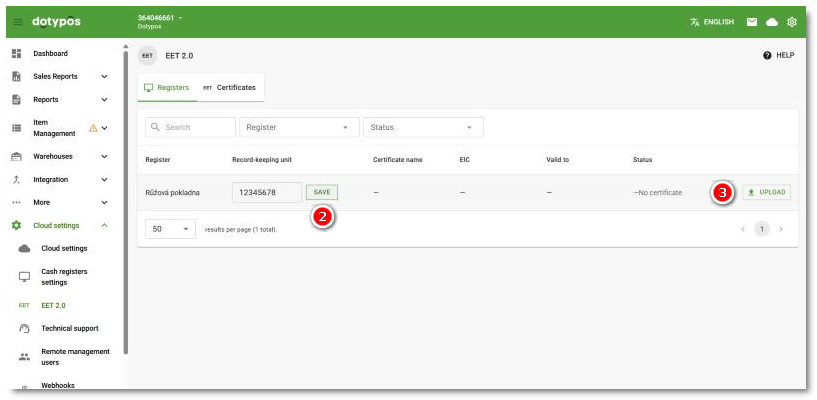
|
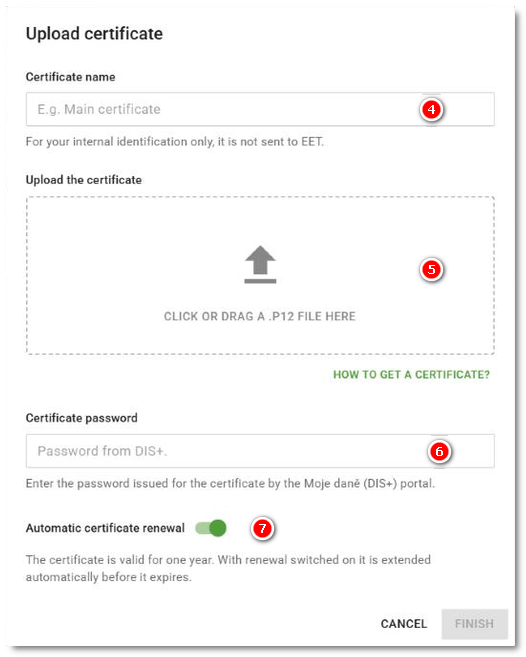
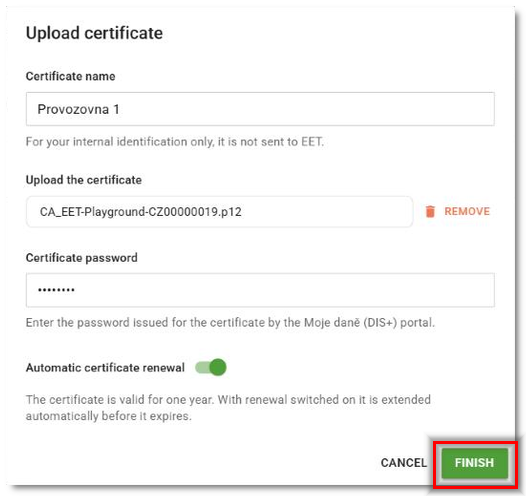
The dialog for uploading the certificate will be displayed. Enter your own name for the certificate |
 to select the downloaded certificate on your computer. In the field

 . The certificate will then be renewed automatically every year, the Dotypos cloud will verify it itself, and you will not have to generate a new certificate at the Financial Administration every year (which is the standard validity period of a certificate) and go through the whole procedure again. Once all the details are entered correctly, save the certificate to the cash register by clicking the
|
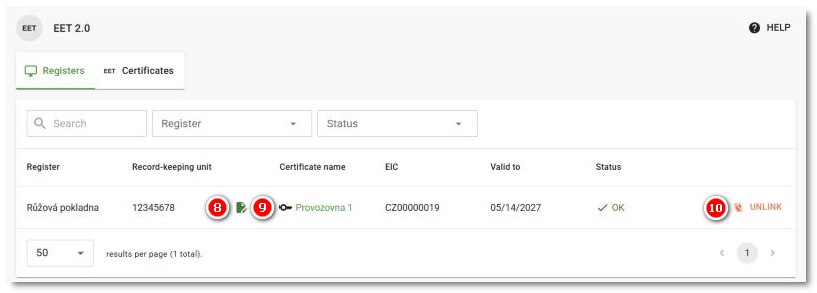
The certificate is uploaded / linked to the selected cash register. Click the icon |
 to change the registration unit number later. Clicking the


|
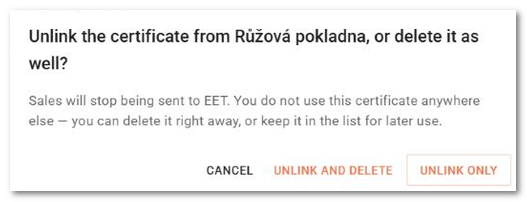
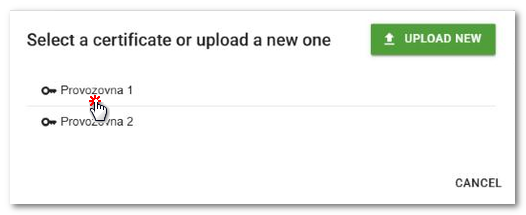
When unlinking the certificate, you choose between removing it from the cash register (UNLINK ONLY) or also deleting the certificate completely from the Dotypos cloud (UNLINK AND DELETE). If you only unlink the certificate, it is removed from the cash register but remains in the Dotypos cloud, so it can be assigned to another cash register again with the UPLOAD button in the list of cash registers. So if you have at least one certificate uploaded in the Dotypos cloud, it will always be displayed under its saved name when uploading and you can use it, or upload a new one with the button. |
Overview of uploaded certificates
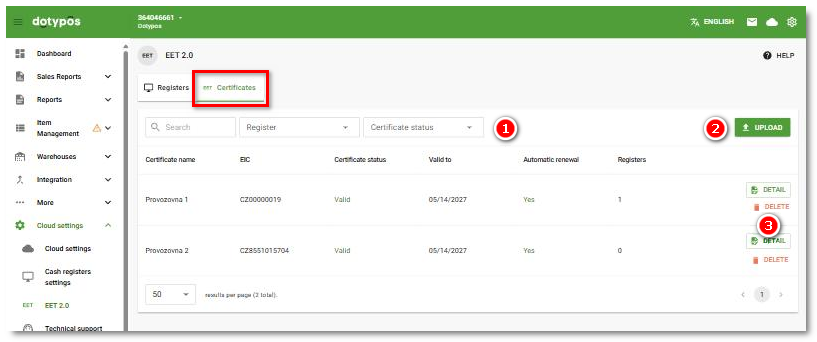
On the Certificates tab you will see a list of all uploaded certificates. You filter the displayed certificates using the fields  in the header. It is also possible to upload a new certificate here
 . You display the certificate properties with the DETAIL
 button. If you delete a certificate here, it will also be unlinked from the cash register to which it was assigned.
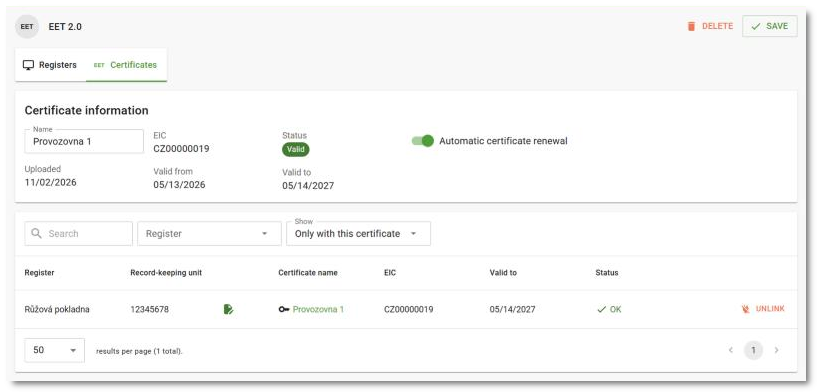
In the displayed certificate properties, you can change its name and activate / deactivate automatic renewal. We recommend keeping automatic renewal active. You will not have to upload a new certificate to the cash registers after the certificate expires. When changing the properties, remember to save everything with the button in the header.
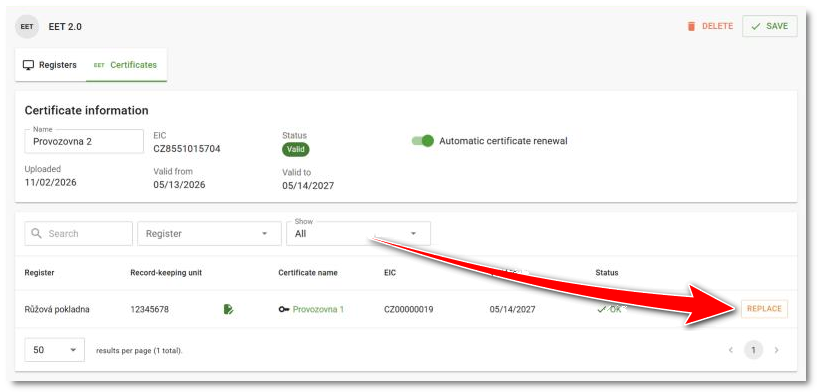
By default, only the cash registers with this certificate are displayed under the certificate properties. If you change the filter in the header to display all cash registers, you will be able to add this certificate to other cash registers with the REPLACE button.
Verifying the certificate on the cash register
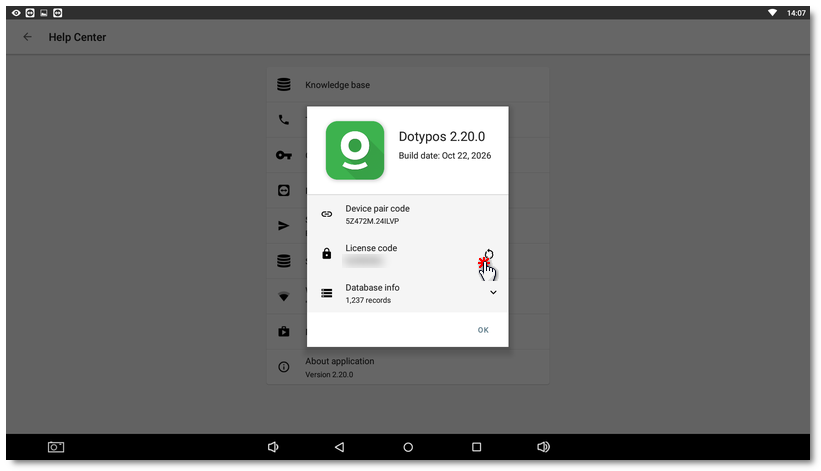
On the cash register, you can check that the sales registration is set up correctly. The live EET 2.0 mode is added to cash registers as part of a standard update of the Dotypos application. If the cash register is continuously connected to the internet, it updates automatically. So first check that you have the current version of the Dotypos application on the cash register. The version should be 2.19 or higher. You can find the version of the Dotypos application under the Help Center tile on the main screen.
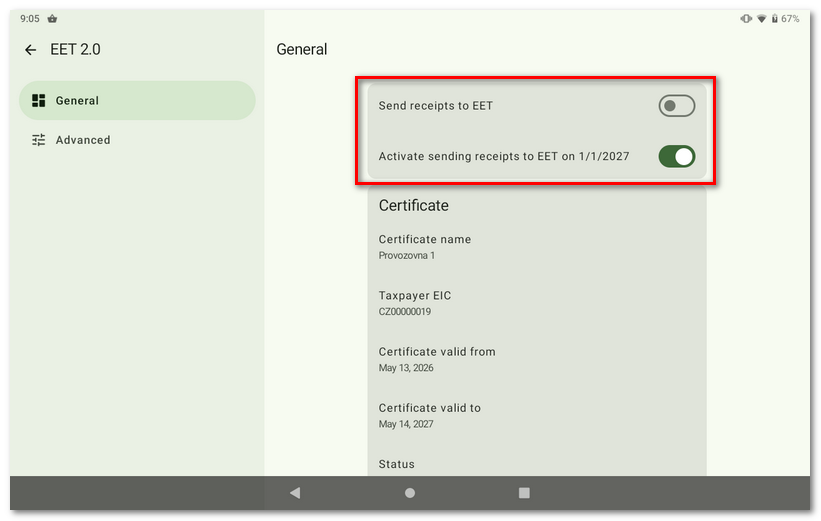
In the Dotypos side menu, tap Application Settings and then the EET 2.0 tab. On the General card you will see the inactive option Send receipts to EET and the automatic activation from 1.1.2027 turned on. There is also information about the uploaded certificate – certificate name, taxpayer EIC, validity, status and the automatic renewal setting.
|
If you upload the certificate to the cash registers before 1.1.2027, EET 2.0 will be set up in the cash register so that the cash register automatically activates sending receipts only from 1.1.2027. If you upload the certificate after 1.1.2027, sending of sales will be active immediately. We therefore do not recommend changing the Send receipts to EET setting on the cash register. Keep the default setting, in which the actual fiscalization (sending of receipts) starts automatically from 1.1.2027. If you turn sending on now, unsent receipts will remain in the cash register and the cash register will report an error, because the production servers of the Financial Administration are not running yet. |
|
The AI assistant Doty can also help you with setting up EET 2.0 in Dotypos at any time. You will find it under the blue icon in the lower left corner after logging in to the Dotypos cloud. |

Once fiscalization is set up correctly and verified with a test sale, see the next chapter for the fiscalization options offered by the cash register.