» Available only in Dotypos UNLIMITED. « |
|---|
Dotypos supports independent sales for more sellers at the same cash register. So one cash register with one Dotypos license can be used by more independent subjects (so-called sellers) in one establishment. It is useful e.g. for hairdressers, when more hair stylists work in one establishment and each of them is an independent business subject. In other words he/she "works on his / her own".
So in the establishment you need just one POS device with one Dotypos license. Each hairdresser creates their own user account in the cash register, or a user with unlimited access to the cash register (Admin) creates that account. The account is then designated as an independent seller. After that, each seller of this kind sets up his / her own company information, numbering and printing of receipts. You can also use filtering by sellers for Sales reports and Reports in Dotypos Cloud.
Each independent seller in the cash register must observe these rules:
•Must have his/her company information filled out. This information will appear in the receipt heading/footing.
•Uses his/her own series and prefix for the numbering of receipts and for canceling documents and invoices. For each seller, we recommend that you set up a separate prefix for a unique identification of receipts in the History.
•The seller can adjust the printing of receipts and printable data on receipts according to his/her preferences.
•He/she does not have access to all options of the Application settings of Dotypos. The related user privileges in the application settings are ignored by the seller.
•In the History and Sales overview he/she can see only the orders issued by themselves. He/she does not have access to the data of other sellers.
•In the Table Map settings he or she can park orders to the assigned tables.
•It only sees customer accounts that it has created itself, unless you specify otherwise in this setting.
|
•The default user account in the cash register (Admin) usually has access to data and settings of each independent seller. •All sellers share the same products, so for each seller it is useful to have created a separate category of products. •In Dotypos Cloud the independent seller is recorded as an ordinary user. By default, the seller does not have access to Dotypos Cloud. •The seller must always follow the taxation settings in the cash register. For all users / sellers the uniform VAT payer / non-payer settings are valid. •If you remove a seller, their sales records remain in the cash register intact. |
How to create an independent seller in brief:
1.Create a new user account or open an existing one.
2.Label the user account as an independent seller and adjust its settings.
3.Set up the PIN of the user account and save changes.
4.Log out from the cash register. After logging in, the seller can start selling.
How to create an independent seller?
|
Go through the Side menu on the main screen to the Application settings and click on User management. Here create a new user or label an existing one as an independent seller. You can find this option in the lower part of the open user account screen. |
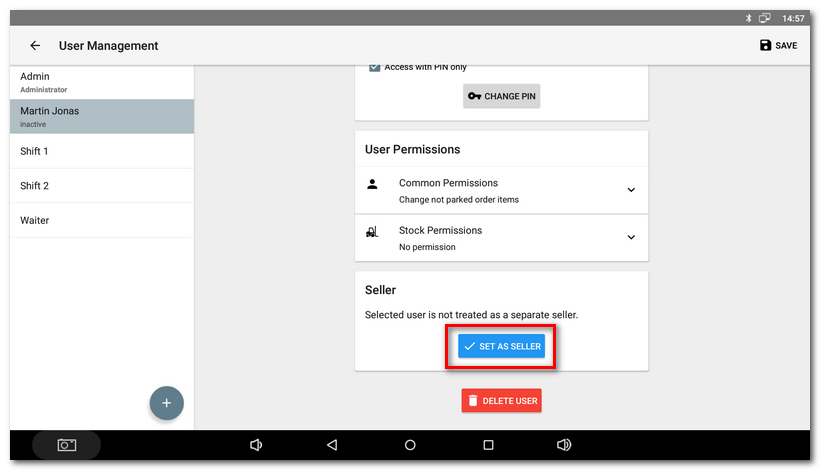
|
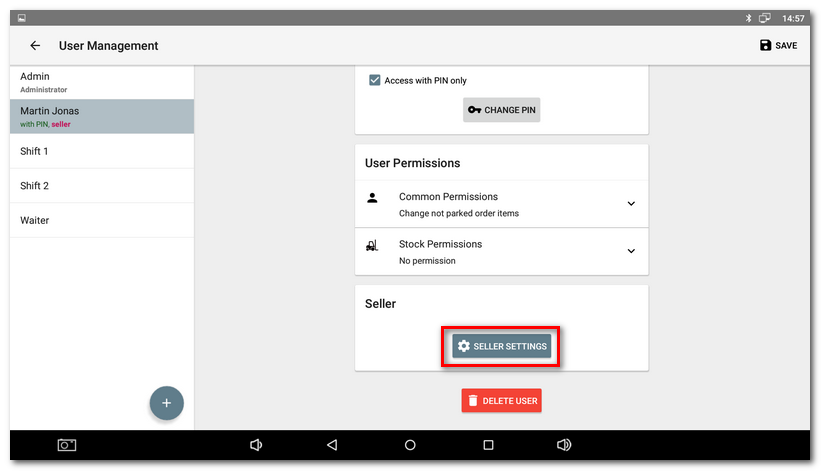
We recommend protecting each seller by PIN so nobody else can sell under his name. Once you label the seller, the button changes to the SELLER SETTINGS. So click on this button again to go to the settings, which are unique for each seller. Each seller will also access their settings after logging into the cash register via the menu in the Side Menu. |
|
Specify the settings for each seller. You can set up your own information about the company that will be used for heading / footer printing, receipt numbering and options for printing receipts. Then go back and save changes in the user account. |

|
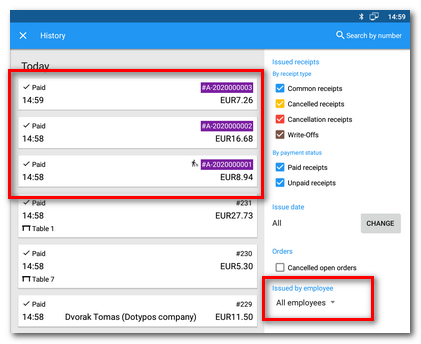
For each seller the letter prefix A-Z will be automatically used for receipt numbering. So the receipts of the first seller will start with A, of the next seller with B. You can also adjust the prefix as you wish. |
|
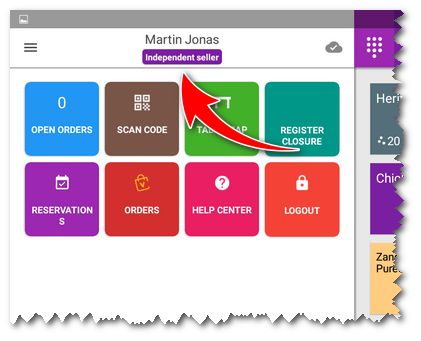
Now just log into the cash register as the specified user. The user working with the cash register as an independent seller will be highlighted in the heading of the main screen. Also his orders will be highlighted in the History. You can filter the orders in the history just by selecting the seller name from the pop-up menu Issued by employee. |
 |
 |
The independent seller has no sale restrictions. So after logging in, he can start selling under his account. Just remember that you always have to log into the cash register with your credentials.
|
The user account is linked to the corresponding seller account. If you rename a user who is also set up as a separate seller, this seller will also be renamed automatically. However, if you rename a seller, the associated user account no longer remains unchanged. The seller and the associated user can thus be named differently. |
How to remove a seller?
An overview of all independent sellers in the cash register with the option to remove a seller can be found in the Application settings in the section Sellers management. By removing a seller you do not delete the relevant user account, it will be just deactivated. If you reactivate it, it will be treated in the cash register as an ordinary user.
Remember that even if you remove a seller, the sales done by this seller remain registered in the cash register without changes.
|
For fast logging in/out of sellers, Dotypos can be connected with a chip reader. So you log in/out just by having the chip read by the reader. And the cash register logs you in/out automatically. In the these settings you can also activate the automatic user logout after issuing the document (closing the order). |