The Mobile Waiter is used in the same way as Dotypos. Working with orders is very quick and easy. The Mobile Waiter supports most cash register operations. The exception is sale by proxy. The Mobile Waiter also supports working with customer credit through the special products Redeem Credit and Recharge Credit. For more information about customer credit, see this chapter.
|
If you are using the Mobile Waiter on a device with a display of at least 8", a full interface similar to the Dotypos app will be displayed. This is described in this chapter. |

Billing with the Mobile Waiter
Billing with the Mobile Waiter
|
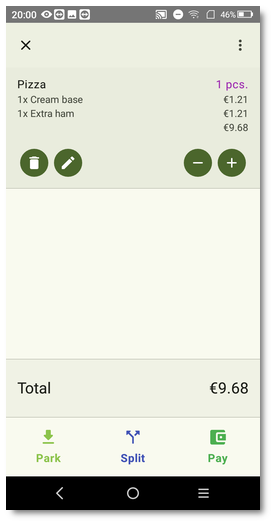
On the main screen Once you are done, tap the bottom bar with the order information If, after billing an item, you press the back button on the bottom panel |

 |
 |
|
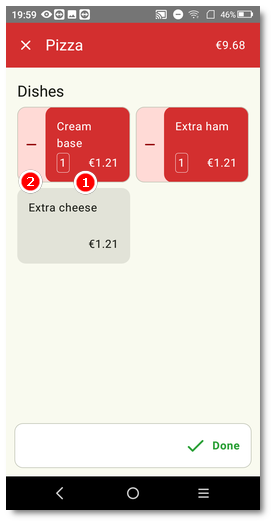
If you bill a product with customizations that do not have a limited quantity, you change the quantity of the displayed toppings by tapping them. Tap the item name |

 |
 |
|
In the open order overview you can see the billed items. You can now park the order By selecting the Pay If you tap a selected order item If takeaway sale is active in the main cash register settings, a dialog for selecting the sale type Eat in / Take away may be displayed before paying the order (depending on the preferred settings of this function). Likewise, a dialog for entering the price / quantity / price level will be displayed if the corresponding options are active for the product on the main cash register. |

 , add a
 |
 |
 |
|
Depending on the payment settings on the main cash register, a dialog for inserting a tip or entering the received amount using the defined coins and banknotes will be displayed after selecting the payment method. With the Paid button you then pay the order with the selected payment method and close it. |

 |
 |
|
If you own a wireless payment terminal, the amount will be transferred directly to the payment terminal when paying by card. Otherwise, the transaction is only registered in the cash register with this payment, and you then have to enter the paid amount on the terminal manually and physically carry out the card payment. |
Parking an order
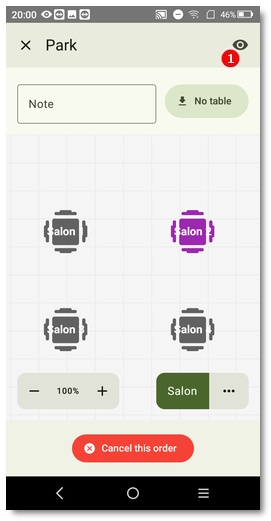
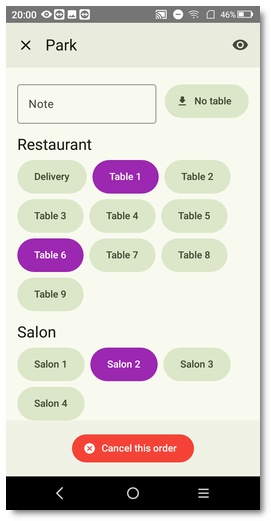
Once you have billed some items, you will be able to park the order using the Park button in the footer. After tapping this button, the table map is displayed by default. Tap the selected table to park the order. Alternatively, you can also park the order without a table or cancel it. Tables with existing orders are marked in purple. Use the  icon to switch between the table map and the table list views. The Mobile Waiter remembers the last view you used.
 |
 |
Open orders and table map
From the Mobile Waiter main screen, you can access the overview of open (parked) orders and also the table map. Working with these items is again simple and similar to the philosophy of Dotypos. The open orders view can be limited to orders issued by the currently logged-in user (Only my orders option in the header). Otherwise, open orders created by other users will also be displayed. As in the table map, the time since the last change is indicated by a color at the beginning of the lines in the open orders overview. Based on the color (from green to red), you can easily see which table has not been served for a long time.
 |
 |
In the list of open orders, you can see all currently parked orders regardless of whether they are assigned to a specific table or not. Tap the selected order to activate it and move back to the main screen with products and categories. The order is now active, so by selecting products from the tiles as usual, you add items to this order again. Use this option when guests who already have an open order order additional items.
As soon as you add new items, tap the bottom line with the order information (see the first picture) and park or pay the order again.
The table map offers the same options. Tap the selected table to open an order and add items to this table, or to display the existing order. As in Dotypos, a table with an already open order is marked with the color corresponding to the time since the last change. Based on the color (from green to red), you can easily tell which table has not been served for a long time. Tables also show an indication of an upcoming or ongoing reservation (purple R). Use the buttons in the footer to zoom the map in / out (can also be done with a two-finger gesture) and switch between pages. The set zoom of the table map is saved for the currently logged-in user, so the Mobile Waiter remembers it.
Open order options
Display the order options by tapping the  icon (see the figure above) for the open (parked) order. A dialog will open with several icons offering other operations with the whole order or with the items on this order. The displayed options depend on the current cash register settings and the properties of the open order.

•By tapping Note you can assign a note to the order, which you will then see in the overview of open orders.
•The Assign customer button offers the customer accounts created in Dotypos. This way you can assign the current order to a specific customer.
•Print order statement prints the current items on the parked order.
•The Cancel this order option voids the entire order.
•With the Top-up credit / Refund credit buttons you perform operations with the customer credit of the selected customer.
•Provide discount lets you select or enter a discount for the entire order in %.
•If you want to pay only part of the order, use the Split items button (see below).
•The Scan code option scans a product barcode or a customer code using the built-in camera.
•The Move all items button moves the order to the selected table or off table.
•Identical items billed several times can be merged into a single item with the corresponding quantity using the Consolidate same items button.
•By tapping New order on table you open a new empty order on the table previously selected from the table map.
•If you want to track the occupancy / traffic of the establishment, use the Guests count button.
•The Eat in / Take away options are displayed if the Takeaway sale feature is enabled in Dotypos.
•On behalf on sale allows you to issue an order by proxy as another entity.
|
•Information about the transactions made in the Mobile Waiter can be found as usual in the History on the main cash register. •In this setting on the main cash register, you can specify whether the cash drawer should be opened when paying via the Mobile Waiter. |

Splitting an order
The dialog for splitting an order is available on the screen with the open order or via the button in the open order menu. You split the items on the order using the - + buttons or the 123  button, which displays a numeric keypad for entering the quantity of the given item to be paid. The same keypad will also be displayed after tapping the quantity field . When using the keypad, enter the quantity to be split / paid and confirm with the Split button.
This way you can easily specify the products that the customer wants to pay for separately. Use the + button to add items to be paid and the - button to remove them. In the bottom part  , the value of the separated items, i.e. those designated for payment, is displayed. Finally, tap the Pay button and the selected items will be added to a separate order for payment.
You can also park the split items to be paid using the  button, thus creating a new open order with these items, which you will pay later.
Once you have paid the split items, the original order with the remaining items will still be left to pay. You can park it, pay it or split it again. You can continue this way until all remaining items on the order have been paid.
 |
 |
Blocking order adjustments
To prevent an order from being adjusted at two places at the same time (the cash register and the Mobile Waiter), the order is blocked. The order is blocked when it is active, i.e. open again, in the cash register or in the Mobile Waiter – in the mode of adding items.
If you open a parked order in the cash register or in the Mobile Waiter that is active elsewhere, a notification will be displayed and it will not be possible to adjust the order. To work with the order further, you have to park it where it is open. The picture below shows the notification in the Mobile Waiter:

The situation in the cash register is similar. An order currently being adjusted in the Mobile Waiter cannot be opened in the parked orders:

However, if you select UNLOCK AND PARK, the order will be parked again and you will be able to reopen it to add more items, or to pay and close it. Unlocking and parking an order can only be done from the cash register. It is not possible to unlock an order open for editing at the cash register from the Mobile Waiter.
Printing from the Mobile Waiter
To print receipts directly from the Mobile Waiter, you can use the built-in printer, if the device contains one. Devices with the Mobile Waiter installed can also be paired with a mobile Bluetooth printer, or you can also use a printer connected to the cash register. Once you have paired the printer, you will be able to select it in the Mobile Waiter settings. Printing is therefore done either on the built-in/paired printer from the Mobile Waiter, or on the cash register printer.
Order printing is always handled by the cash register, i.e. the cash register with which the Mobile Waiter is connected. If you have a print job for order printing defined for a printer in the Dotypos print settings, a kitchen ticket will be printed on this printer after the order is paid or parked.
|
Owners of the Dotypos UNLIMITED license can also use a LAN printer to print receipts from the Mobile Waiter, so they are not limited by the printer location. Using the device filter in the print job, they can also specify from which devices (cash registers or Mobile Waiters) it will be possible to print on this printer. With other licenses, a mobile Bluetooth printer can be used to print receipts. |